-
Products
-
SonicPlatform
SonicPlatform is the cybersecurity platform purpose-built for MSPs, making managing complex security environments among multiple tenants easy and streamlined.
Discover More
-
-
Solutions
-
Federal
Protect Federal Agencies and Networks with scalable, purpose-built cybersecurity solutions
Learn MoreFederalProtect Federal Agencies and Networks with scalable, purpose-built cybersecurity solutions
Learn More - Industries
- Use Cases
-
-
Partners
-
Partner Portal
Access to deal registration, MDF, sales and marketing tools, training and more
Learn MorePartner PortalAccess to deal registration, MDF, sales and marketing tools, training and more
Learn More - SonicWall Partners
- Partner Resources
-
-
Support
-
Support Portal
Find answers to your questions by searching across our knowledge base, community, technical documentation and video tutorials
Learn MoreSupport PortalFind answers to your questions by searching across our knowledge base, community, technical documentation and video tutorials
Learn More - Support
- Resources
- Capture Labs
-
- Company
- Contact Us
Configure Static Neighbor Discovery Protocol Entries(IPv6 only).


Description
The Neighbor Discovery Protocol (NDP) is a messaging protocol that was created as part of IPv6 to perform a number of the tasks that ICMP and ARP are able to accomplish with IPv4.Just like ARP, Neighbor Discovery builds a cache of dynamic entries, and you can configure static Neighbor Discovery entries. The IPv4/IPv6 neighbour table shows the IPv6 neighbour messages and functions that are analogous to the traditional IPv4 neighbour messages.

Configure static Neighbor Discovery Protocol when neighbor cannot be dynamically discovered (e.g. the neighbor appliance does not properly support NDP).
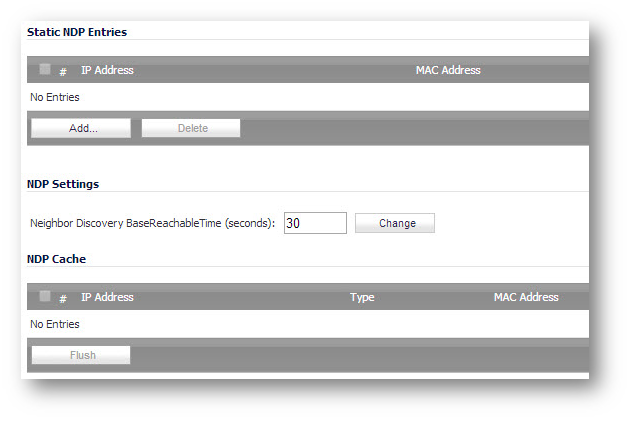
The firewall is directly connected to an IPv6 appliance and there are no entries in the NDP cache table as following.


Under this situation, the neighbor is unreachable.
Hereby, we can configure a static NDP entry for IPv6 traffic.
Resolution
Resolution for SonicOS 7.X
This release includes significant user interface changes and many new features that are different from the SonicOS 6.5 and earlier firmware. The below resolution is for customers using SonicOS 7.X firmware.
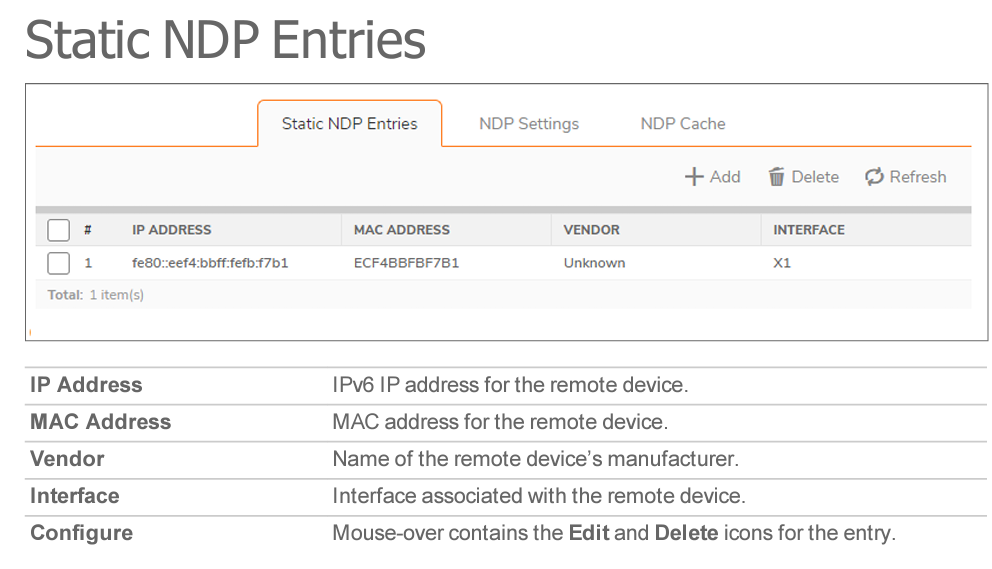
The Static NDP feature allows fo rstatic mappings to be created between a layer 3 IPv6 address and a Layer 2 MAC address

To add a Static NDP entry:
- Navigate to the NETWORK | System > Neighbor Discovery page

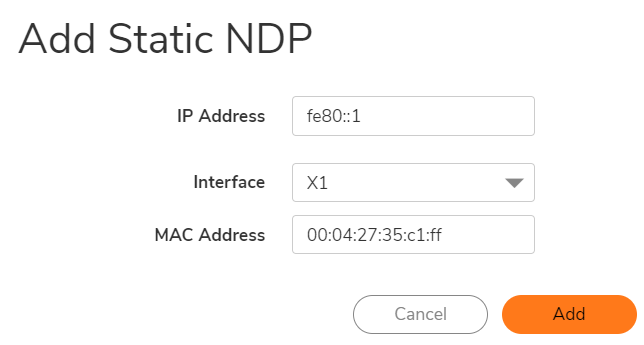
- Under the Static NDP Entries table, click + Add. The Add Static NDP dialog displays.

- In the IP address field, enter the IPv6 address for the remote device.
- From Interface, select the interface on the SonicWallappliance that is used for the entry.
- In the MAC Address field, enter the MAC address of the remote device.
- Click Add. The Static NDP Entry is added.

Resolution for SonicOS 6.2 and Below
The below resolution is for customers using SonicOS 6.2 and earlier firmware. For firewalls that are generation 6 and newer we suggest to upgrade to the latest general release of SonicOS 6.5 firmware.
Navigate to Network | Neighbor Discovery page.
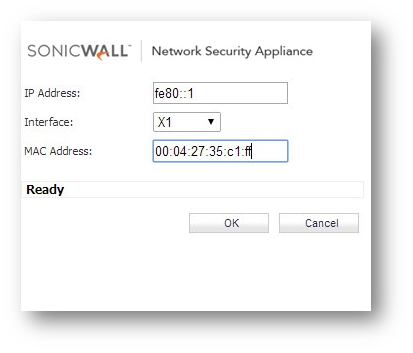
Step 1: Click on Add button of Static NDP Entries.
- In the IP Address field, enter the IPv6 address for the remote device.
- In the Interface pulldown menu, select the interface on the firewall that will be used for the entry.
- In the MAC Address field, enter the MAC address of the remote device.
- Click OK.
The neighbor was manually configured as a static neighbor.
Step 2: Go to System | Diagnostics page
Ping the Neighbor, the static NDP entry takes effect.
Related Articles
- Error:"Invalid API Argument" when modifying the access rules
- Cysurance Partner FAQ
- Configure probe monitoring for WAN Failover and Loadbalancing - SonicWall UTM
Categories
- Firewalls > TZ Series
- Firewalls > SonicWall SuperMassive E10000 Series
- Firewalls > SonicWall SuperMassive 9000 Series
- Firewalls > SonicWall NSA Series


 YES
YES NO
NO