-
Products
-
SonicPlatform
SonicPlatform is the cybersecurity platform purpose-built for MSPs, making managing complex security environments among multiple tenants easy and streamlined.
Discover More
-
-
Solutions
-
Federal
Protect Federal Agencies and Networks with scalable, purpose-built cybersecurity solutions
Learn MoreFederalProtect Federal Agencies and Networks with scalable, purpose-built cybersecurity solutions
Learn More - Industries
- Use Cases
-
-
Partners
-
Partner Portal
Access to deal registration, MDF, sales and marketing tools, training and more
Learn MorePartner PortalAccess to deal registration, MDF, sales and marketing tools, training and more
Learn More - SonicWall Partners
- Partner Resources
-
-
Support
-
Support Portal
Find answers to your questions by searching across our knowledge base, community, technical documentation and video tutorials
Learn MoreSupport PortalFind answers to your questions by searching across our knowledge base, community, technical documentation and video tutorials
Learn More - Support
- Resources
- Capture Labs
-
- Company
- Contact Us
Bandwidth Management over Site to Site VPN


Description
Bandwidth Management (BWM) is allocating bandwidth resources to critical applications on a network. SonicOS Enhanced 6.5 and above firmware offers an integrated traffic shaping mechanism through its ingress and egress BWM interfaces. BWM can be applied to traffic in either the ingress or egress directions, or both.
This article illustrates configuration of bandwidth management on SonicWall for site to site VPN traffic on SonicOS Enhanced 6.5 series of firmwares.
Prerequisite: Site to Site VPN should be established.
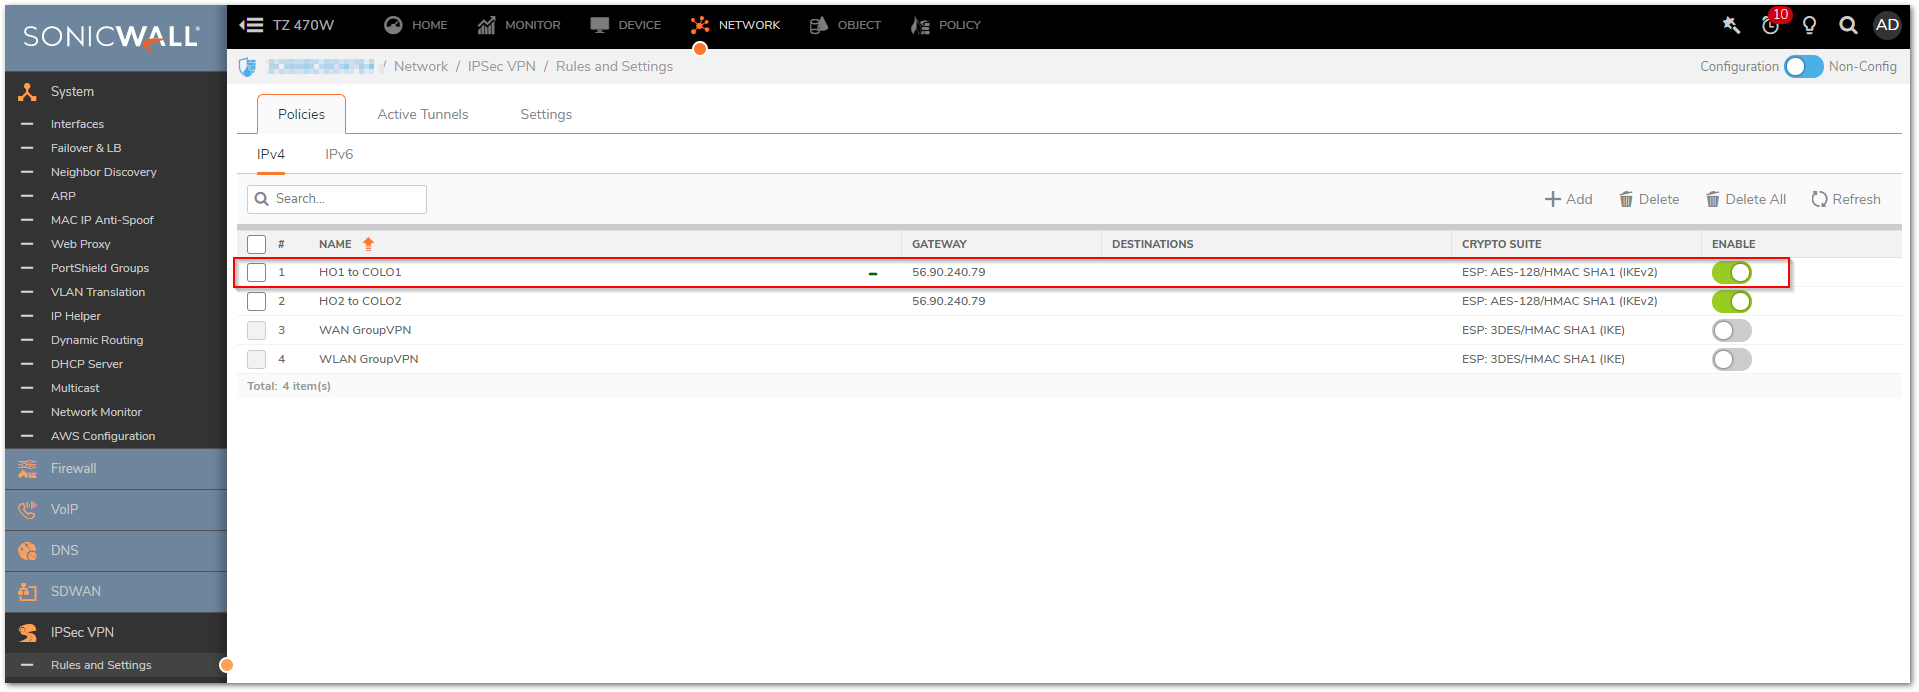
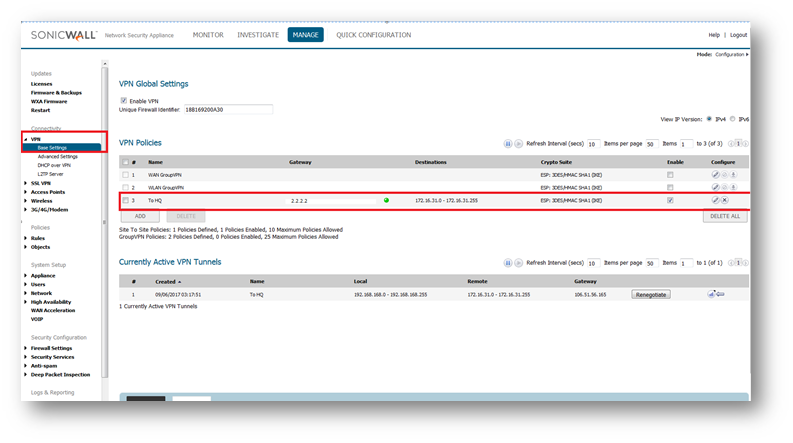
Resolution
Resolution for SonicOS 7.X
This release includes significant user interface changes and many new features that are different from the SonicOS 6.5 and earlier firmware. The below resolution is for customers using SonicOS 7.X firmware.
Enabling Bandwidth Management on SonicWall
- Click Manage in the top navigation menu.
- Navigate to Security Configuration | Firewall Settings | BWM Management page in the GUI.
- Choose Bandwidth Management Type as Advanced and click Accept on top.
Enabling Bandwidth Management on the Active WAN Interface(s)
- Navigate to NETWORK | System | Interfaces page in the GUI.
- Click Edit this interface (pencil icon)option of the active WAN connection. (Here single WAN connection is used).
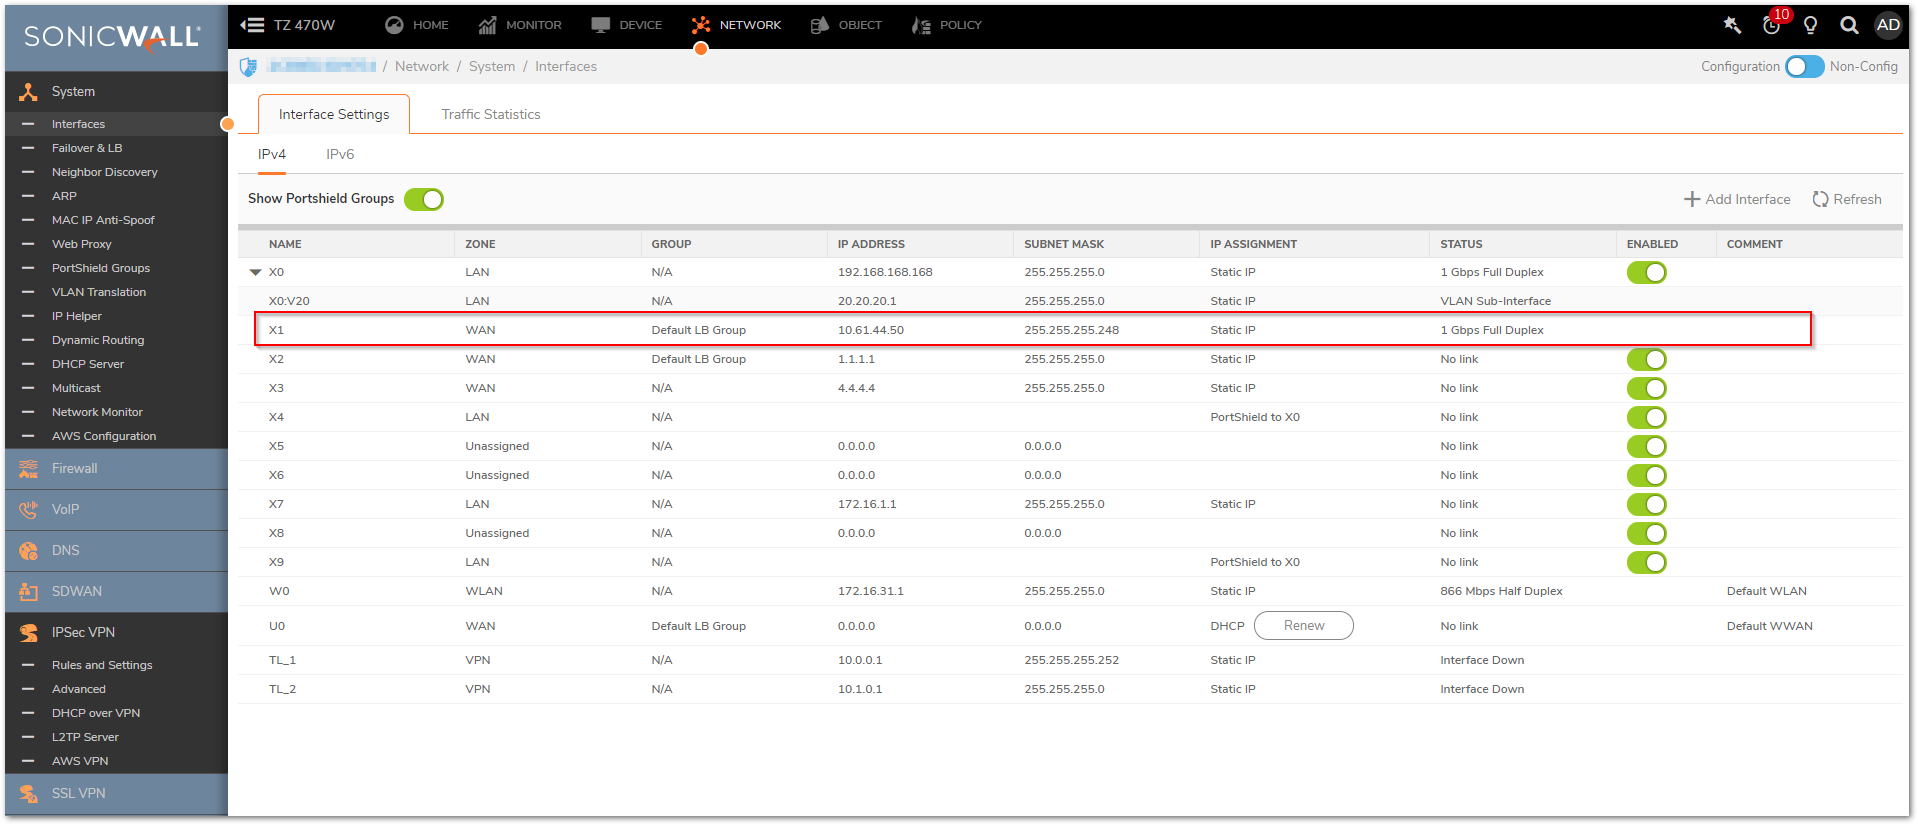
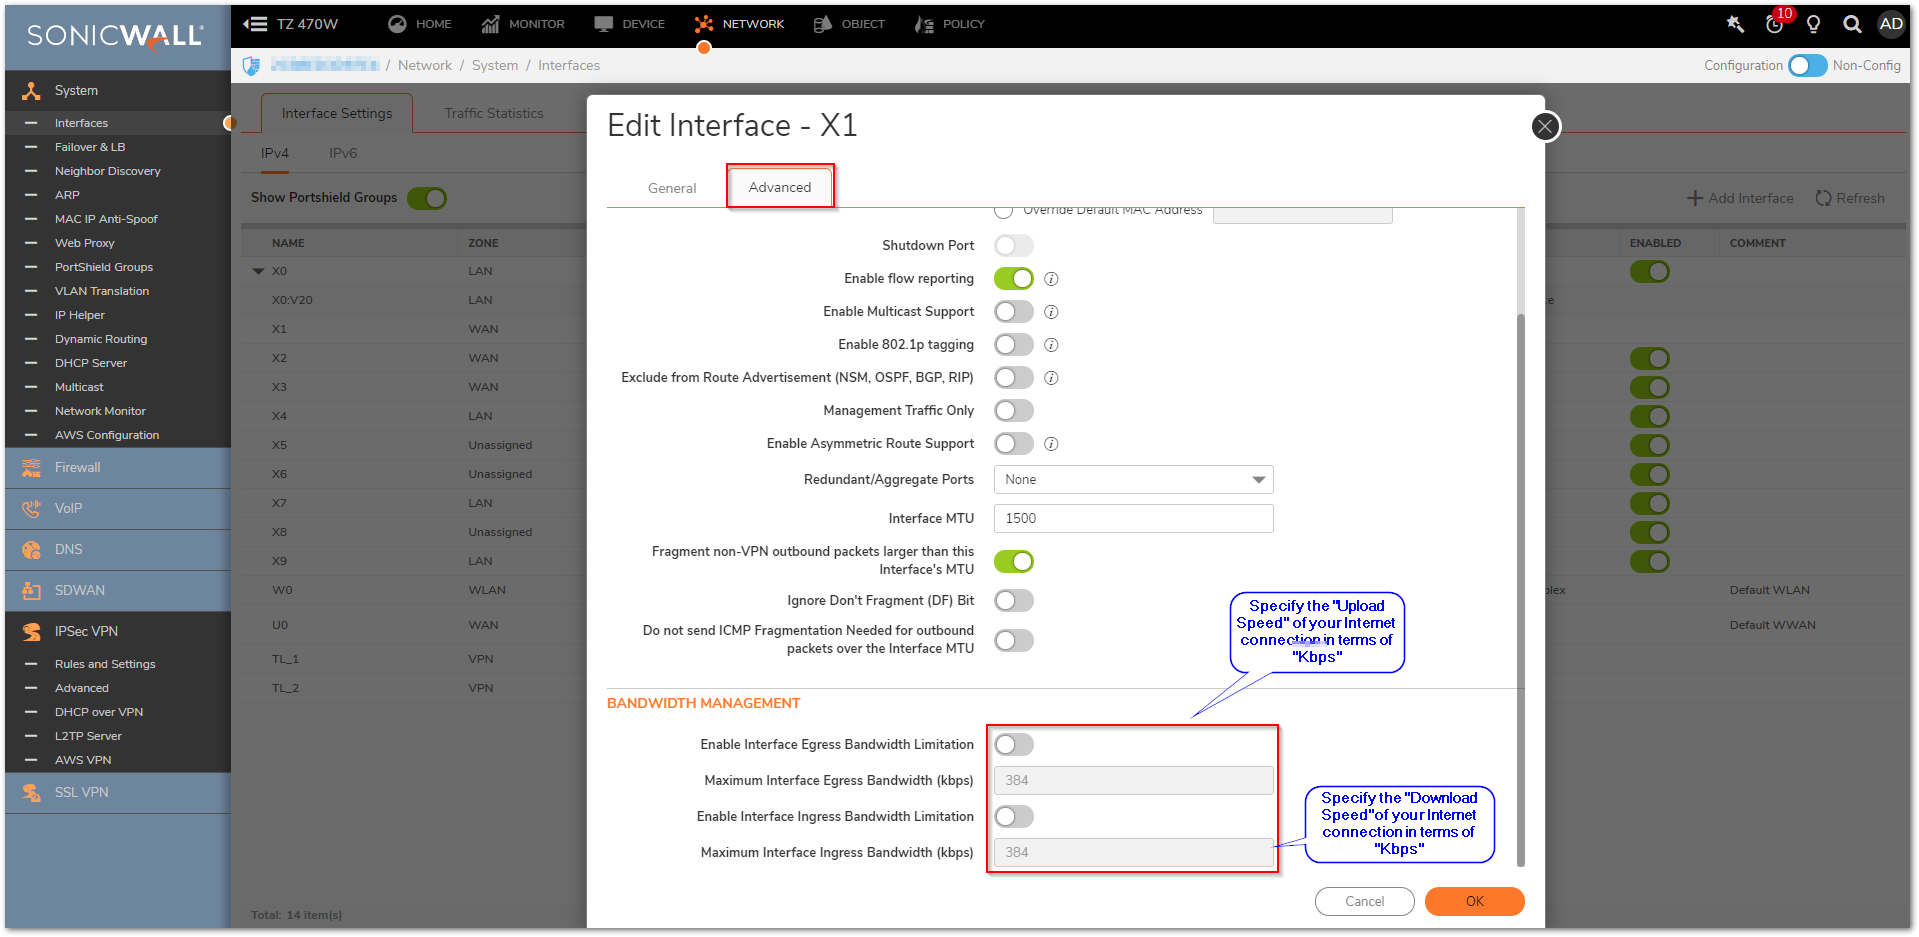
- In the Advanced tab, under Bandwidth Management enable the check boxes Enable Interface Egress Bandwidth Limitation & Enable Interface Egress Bandwidth Limitation and specify the Egress & IngressBandwidth Values in terms of Kbps respectively.
- Click OK .
Creating Bandwidth Object
- Navigate to OBJECTS | Profile Objects | Bandwidth page in the GUI.
- Click Add under Bandwidth Objects.

3.In the new window, enter the fields as given below.
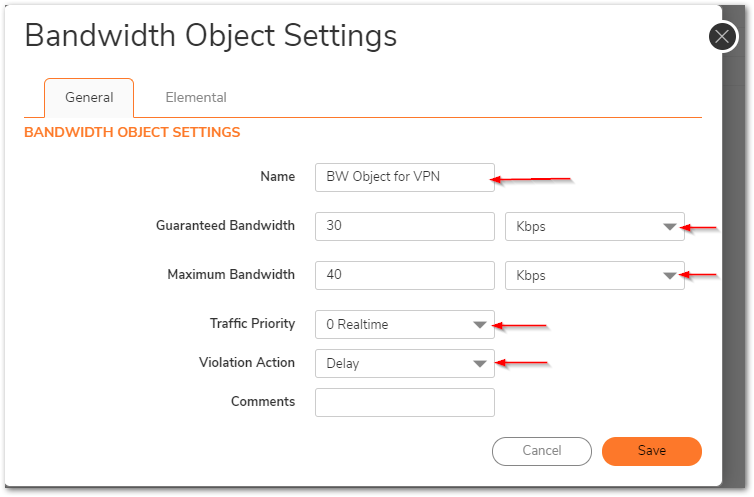
- Name: Any friendly name for the bandwidth object.
- Guaranteed Bandwidth: Enter the amount of bandwidth that this bandwidth object will guarantee to provide for a traffic class (Kbps or Mbps).
- Maximum Bandwidth: Enter the maximum amount of bandwidth that this bandwidth object will provide for a traffic class.
- Traffic Priority: Enter the priority that this bandwidth object will provide for a traffic class (highest priority is 0 and lowest priority is 7).
- Violation Action: Delay or Drop - Select the action that this bandwidth object will provide (delay or drop) when traffic exceeds the maximum bandwidth setting.
- Comment: Enter a text comment or description for this bandwidth object (optional).
- Click OK .
Configuring LAN to VPN access rule with BWM
- Navigate to POLICY | Rules and Policies | Access Rules page in the GUI.
- Choose the From , Choose LAN to VPN as shown in the GUI.
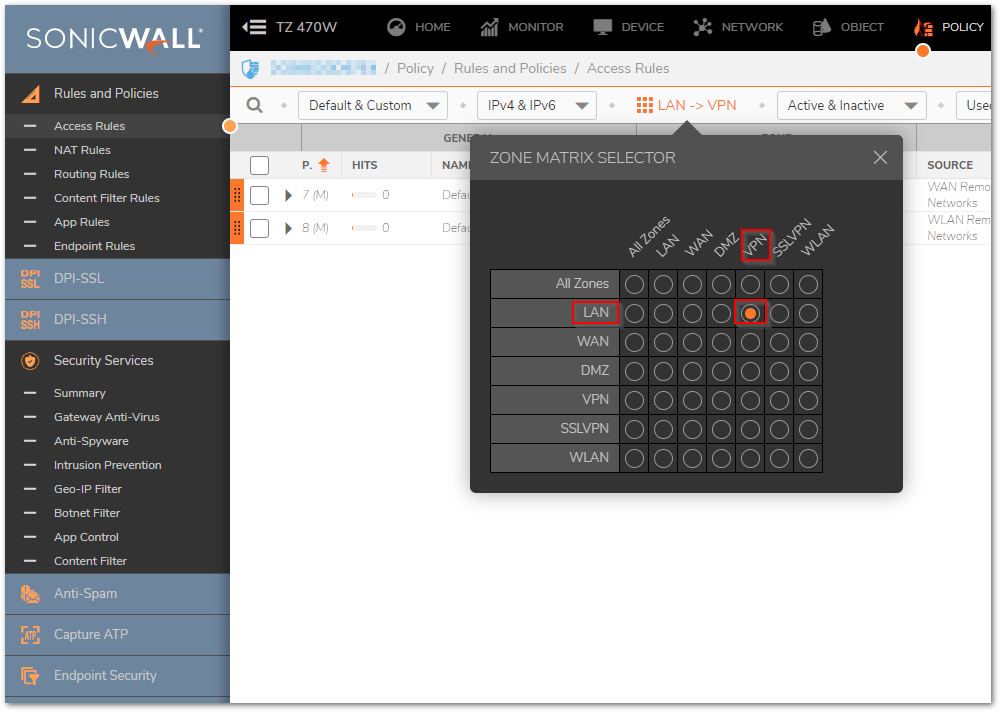
- Click Configure option of appropriate LAN to VPN access rule.
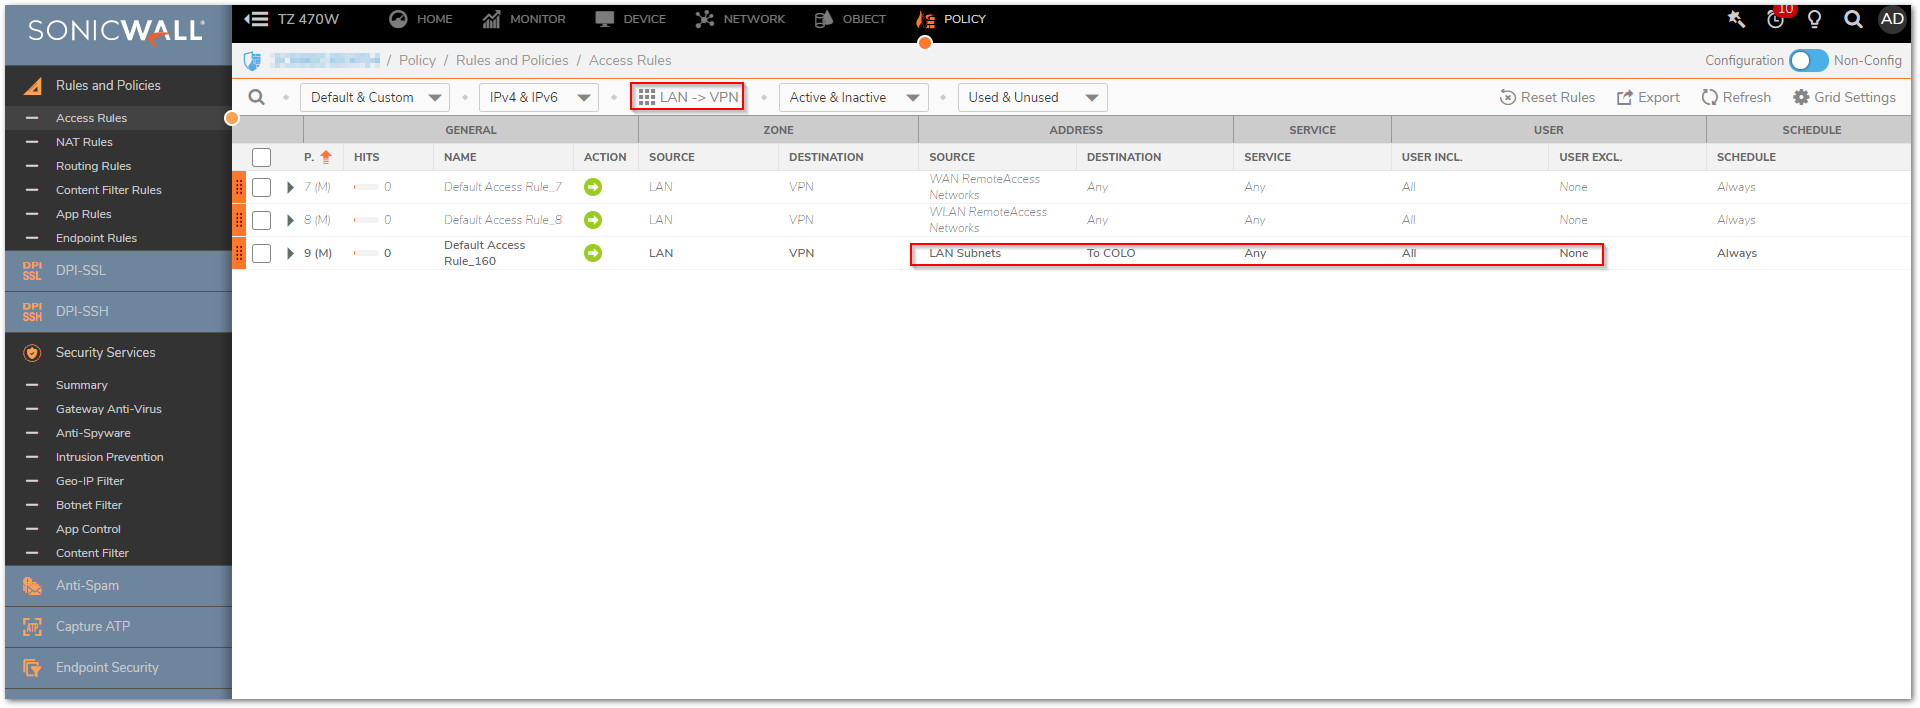
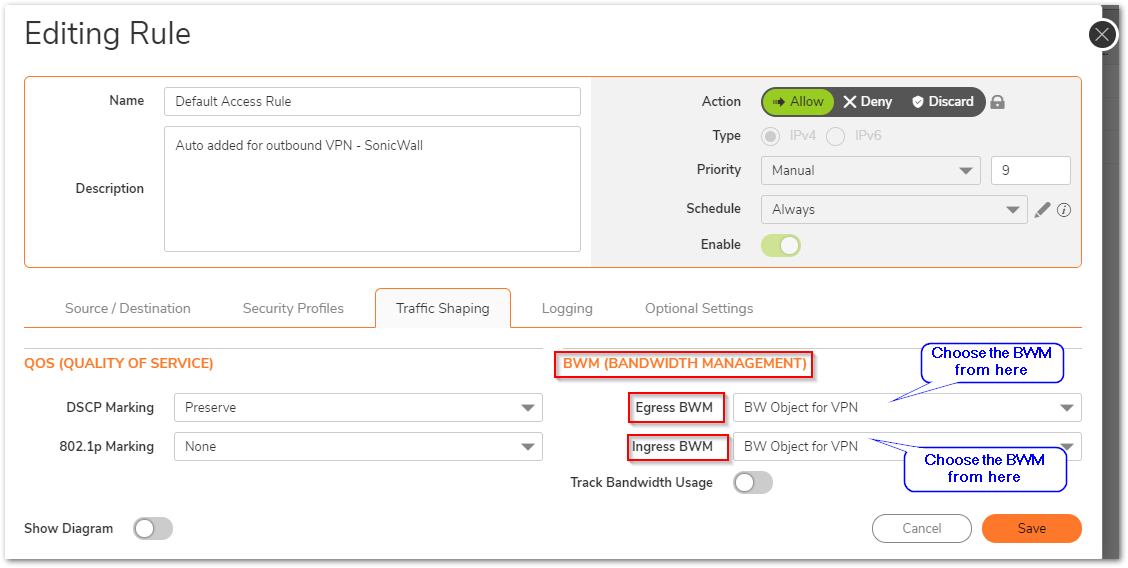
- Navigate to Traffic Shaping | BWM tab.
- Set, Enable Egress Bandwidth Management (Allow rules only) Bandwidth Object and Enable Ingress Bandwidth Management (Allow rules only) Bandwidth Object to the bandwidth object that was created previously.
Configuring VPN to LAN access rule with BWM
- Navigate to POLICY | Rules and Policies | Access Rules page in the GUI.
- Choose the From, Choose VPN to LAN as shown in the GUI.
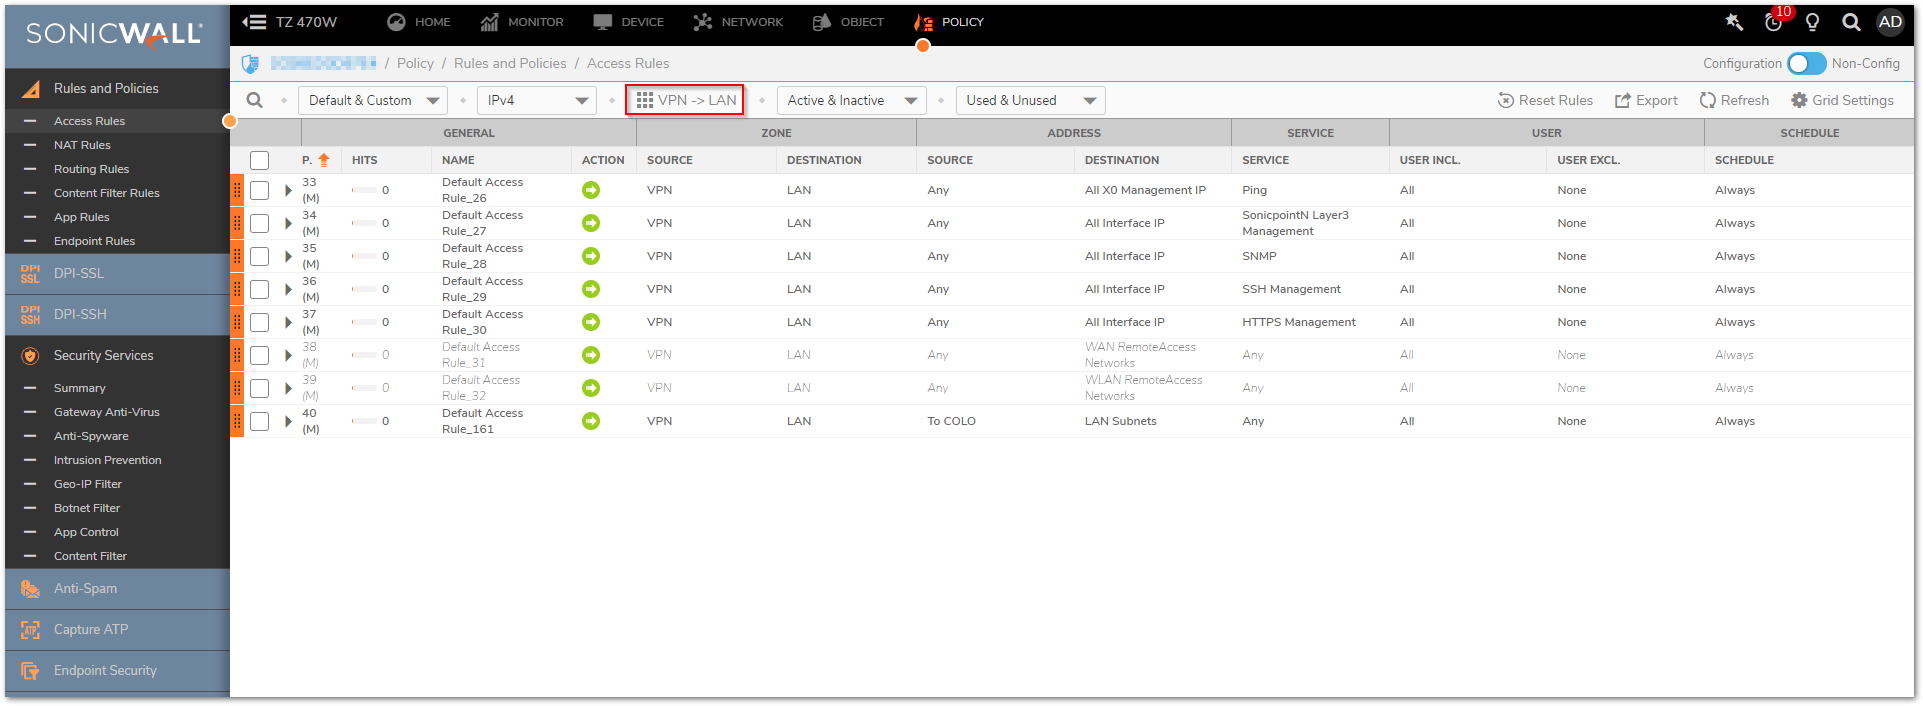
- Click configure option of appropriate VPN to LAN access rule.
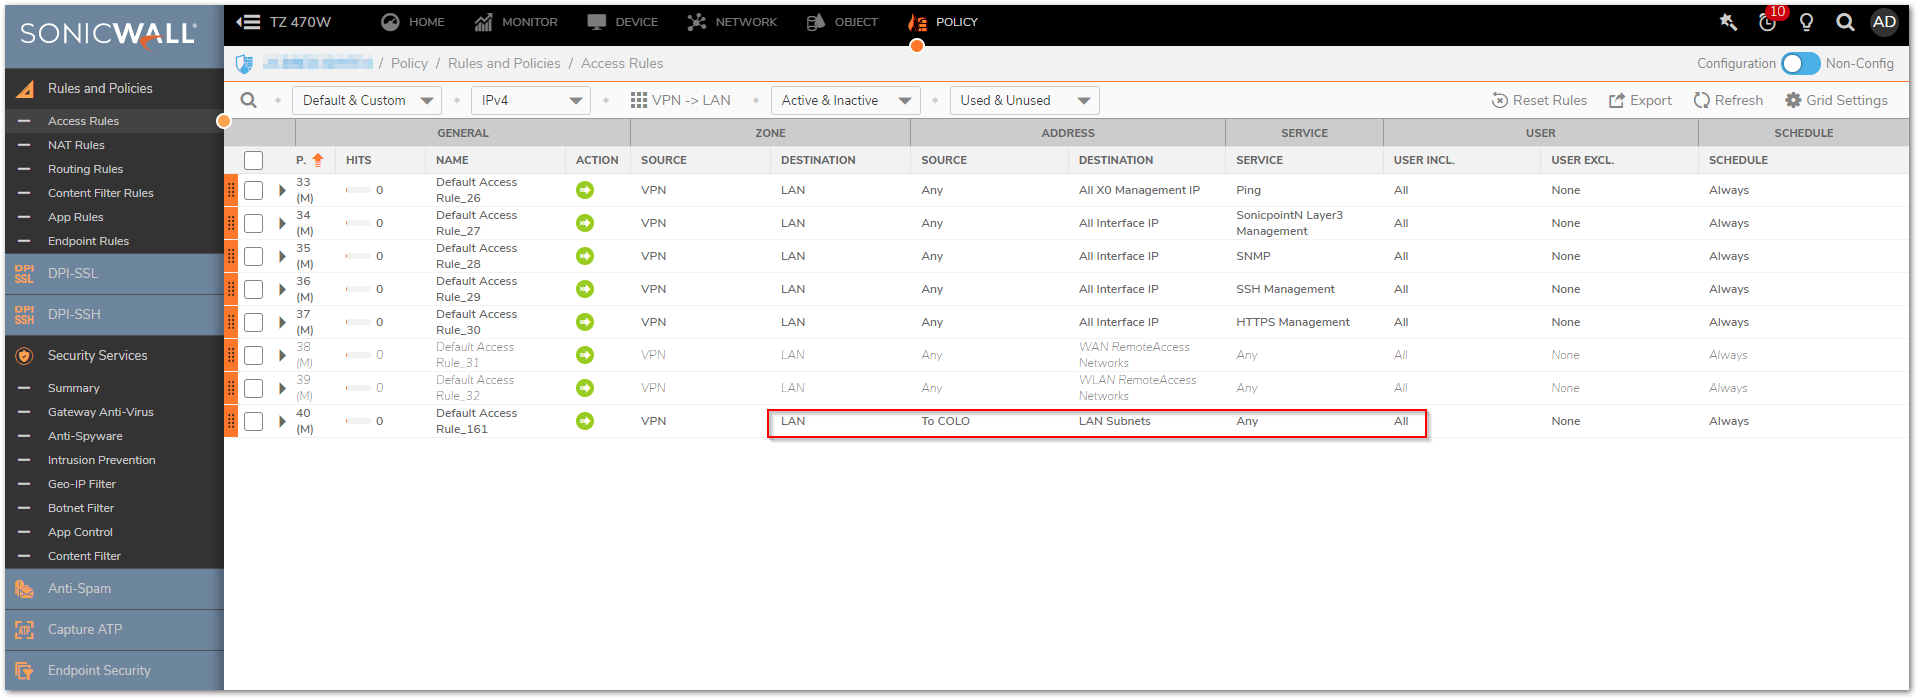
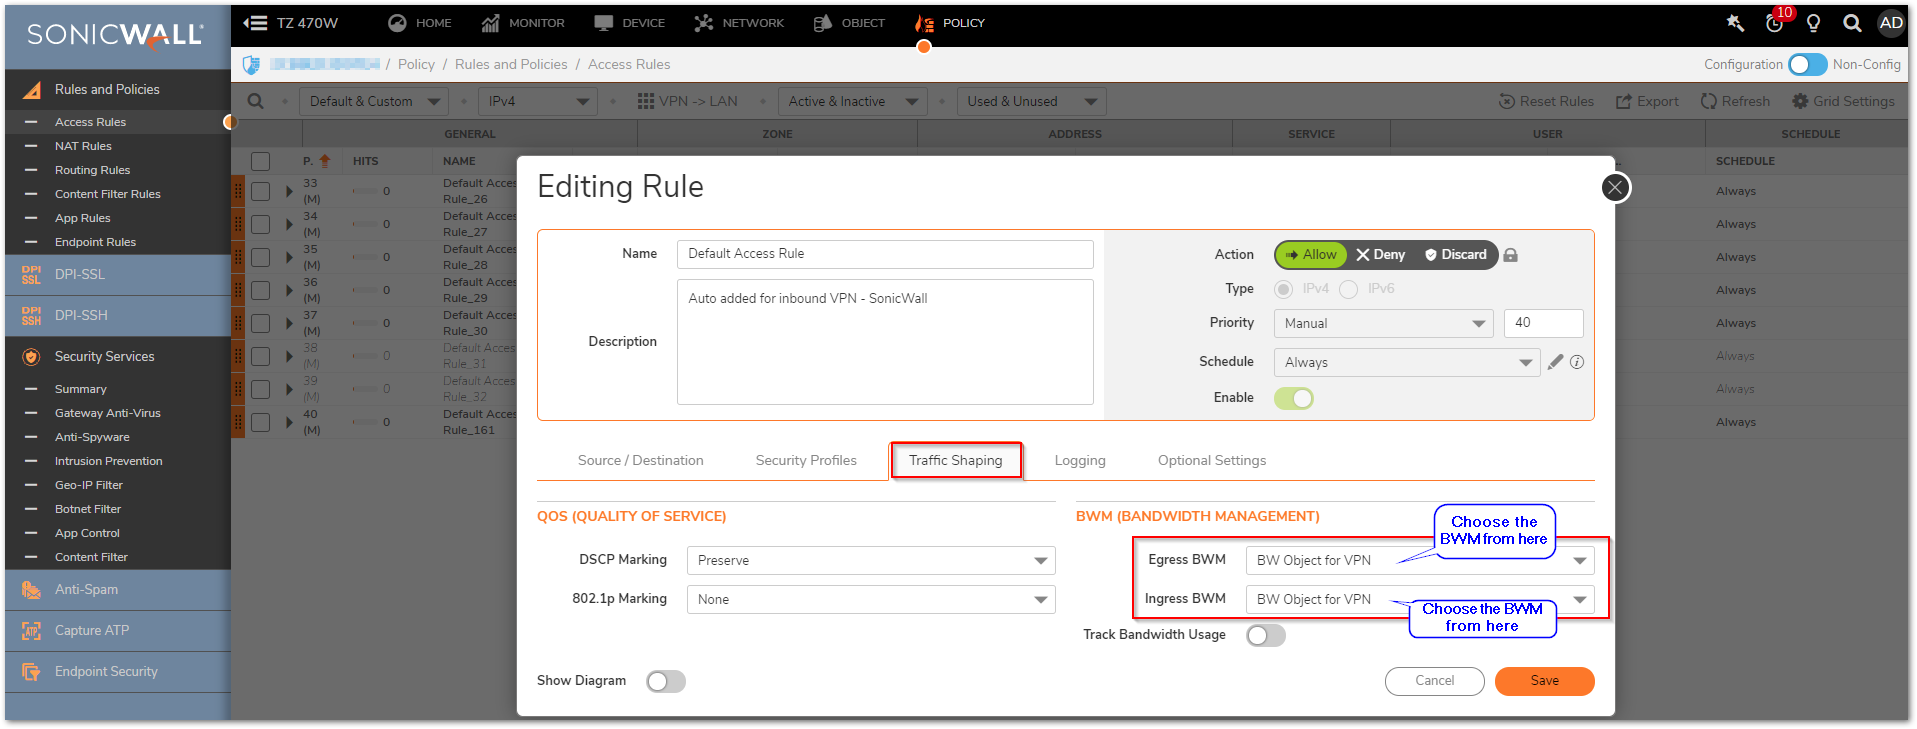
- Navigate to Traffic Shaping | BWM tab.
- Set, Enable Egress Bandwidth Management (Allow rules only) Bandwidth Object and Enable Ingress Bandwidth Management (Allow rules only) Bandwidth Object to the bandwidth object that was created previously.
Resolution for SonicOS 6.5
This release includes significant user interface changes and many new features that are different from the SonicOS 6.2 and earlier firmware. The below resolution is for customers using SonicOS 6.5 firmware.
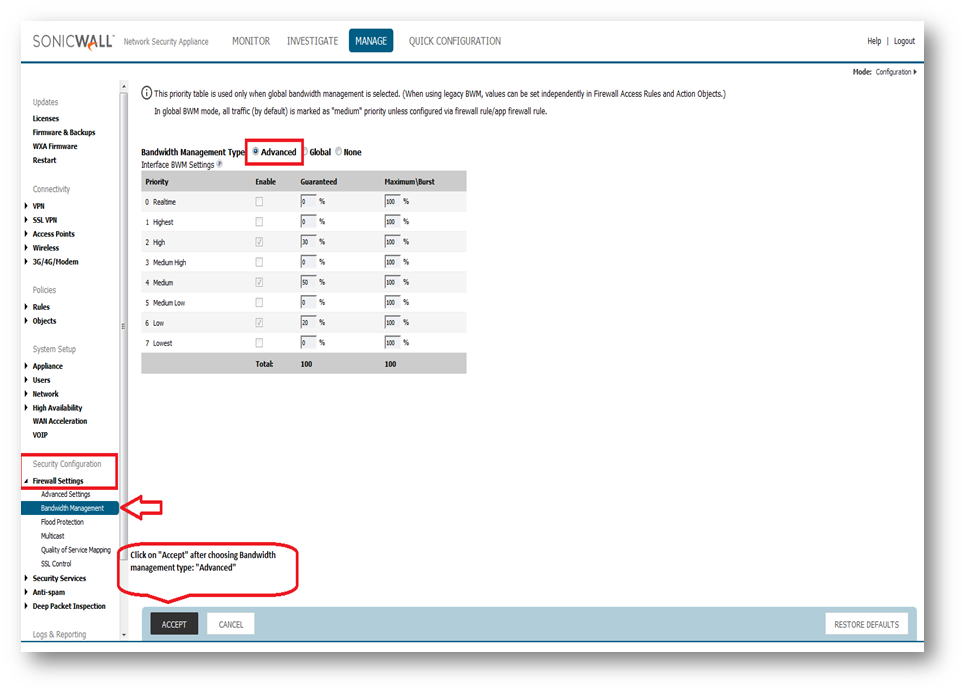
Enabling Bandwidth Management on SonicWall
- Click Manage in the top navigation menu.
- Navigate to Security Configuration | Firewall Settings | BWM Management page in the GUI.
- Choose Bandwidth Management Type as Advanced and click Accept on top.
Enabling Bandwidth Management on the Active WAN Interface(s)
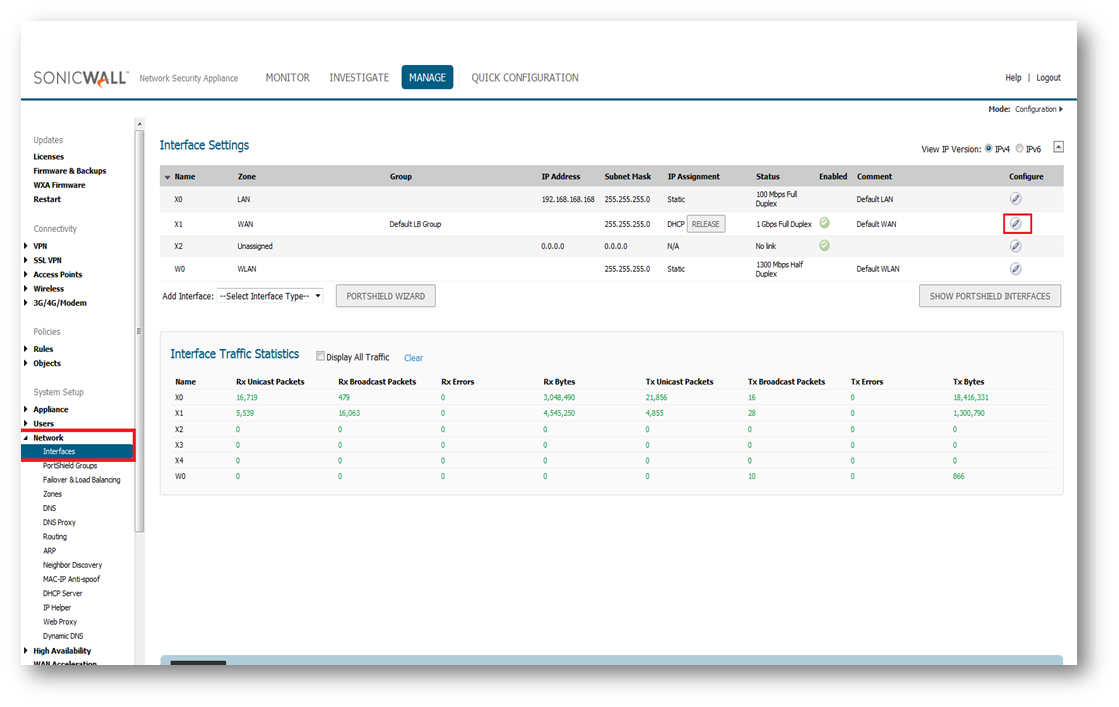
- Navigate to System Setup |Network | Interfaces page in the GUI.
- Click Configure option of the active WAN connection. (Here single WAN connection is used).
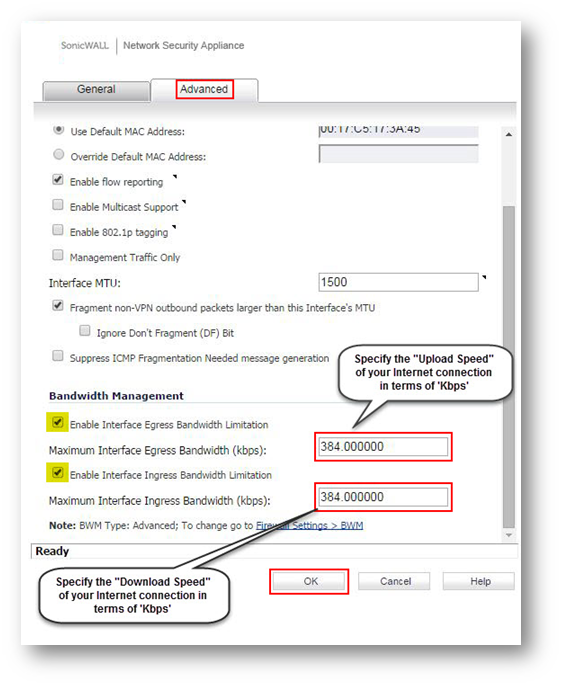
- In the Advanced tab, under Bandwidth Management enable the check boxes Enable Interface Egress Bandwidth Limitation & Enable Interface Egress Bandwidth Limitation and specify the Egress & IngressBandwidth Values in terms of Kbps respectively.
- Click OK .
Creating Bandwidth Object
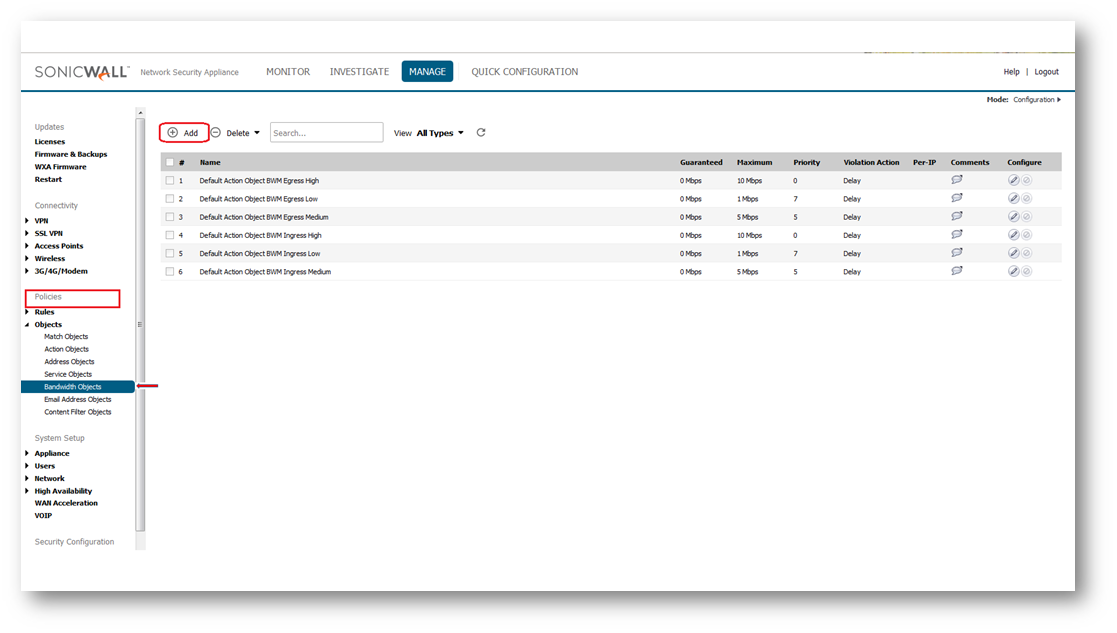
- Navigate to Policies | Objects | Bandwidth Objects page in the GUI.
- Click Add under Bandwidth Objects.
- In the new window, enter the fields as given below.
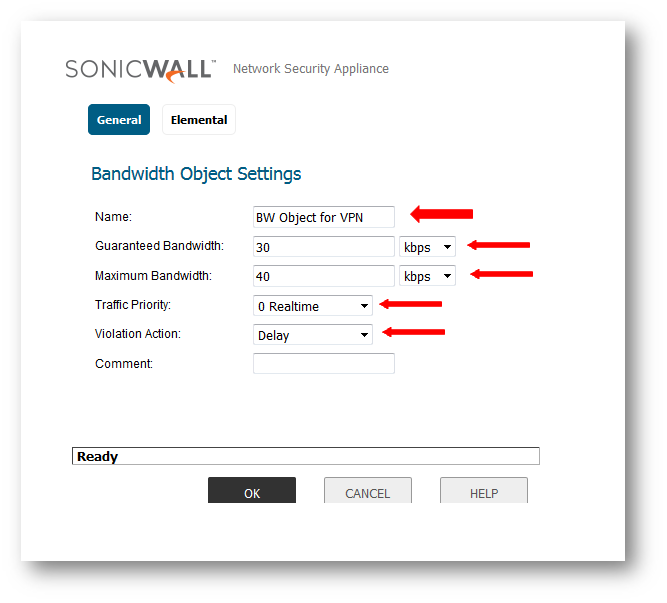
- Name: Any friendly name for the bandwidth object.
- Guaranteed Bandwidth: Enter the amount of bandwidth that this bandwidth object will guarantee to provide for a traffic class (Kbps or Mbps).
- Maximum Bandwidth: Enter the maximum amount of bandwidth that this bandwidth object will provide for a traffic class.
- Traffic Priority: Enter the priority that this bandwidth object will provide for a traffic class (highest priority is 0 and lowest priority is 7).
- Violation Action: Delay or Drop - Select the action that this bandwidth object will provide (delay or drop) when traffic exceeds the maximum bandwidth setting.
- Comment: Enter a text comment or description for this bandwidth object (optional).
- Click OK .
Configuring LAN to VPN access rule with BWM
- Navigate to Policies | Firewall | Access Rules page in the GUI.
- Choose the From , Choose LAN to VPN as shown in the GUI.
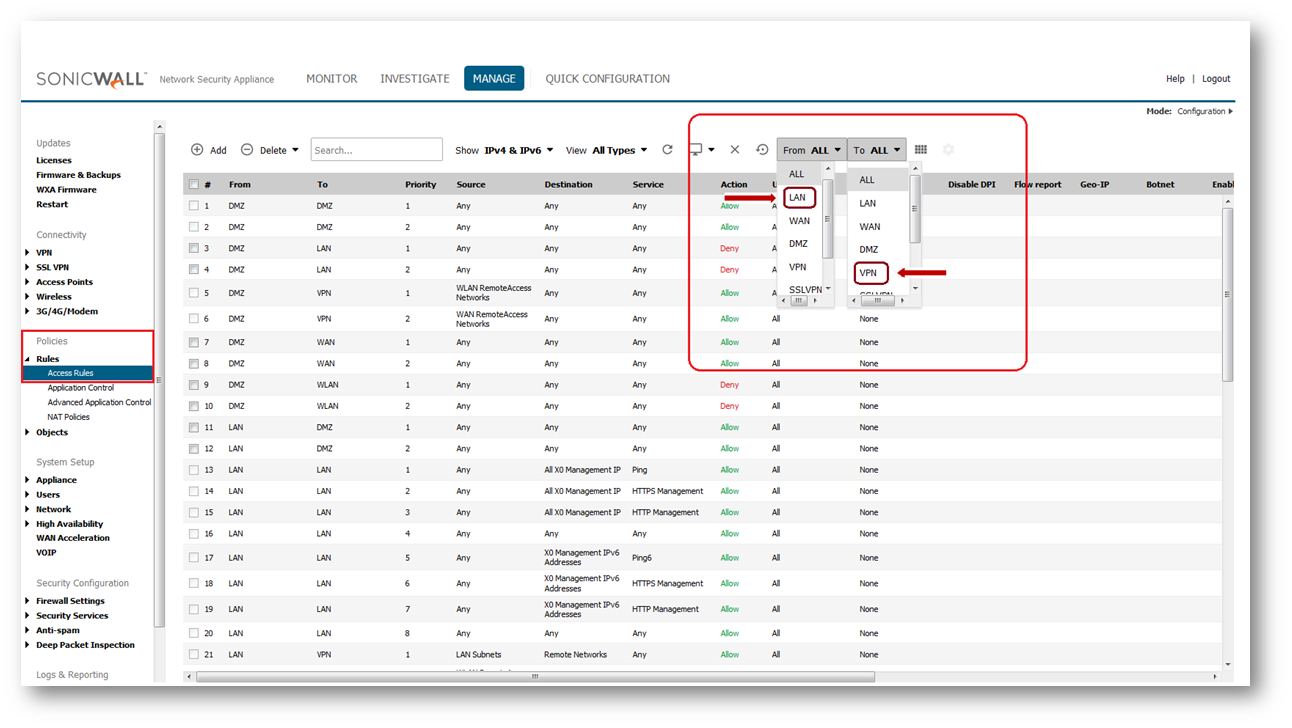
- Click configure option of appropriate LAN to VPN access rule.
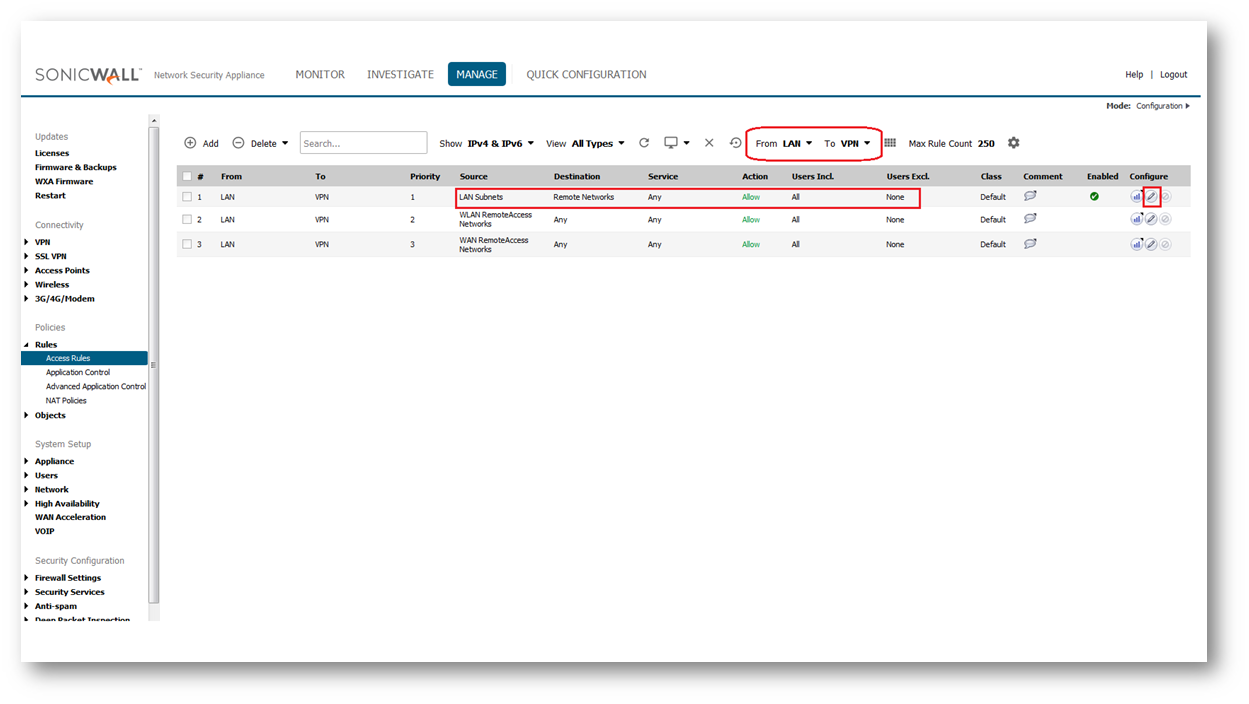
- Navigate to BWM tab.
- Set, Enable Egress Bandwidth Management (Allow rules only) Bandwidth Object and Enable Ingress Bandwidth Management (Allow rules only) Bandwidth Object to the bandwidth object that was created previously.
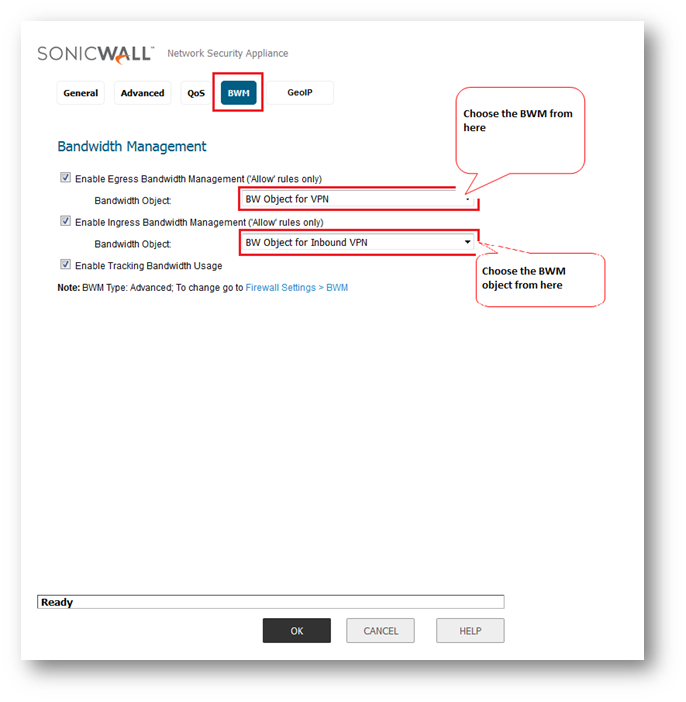
- Click OK.
- To ensure BWM is applied on LAN to VPN access rule, there is a Filter Symbol that gives the Bandwidth Management information as shown in the screenshot below.
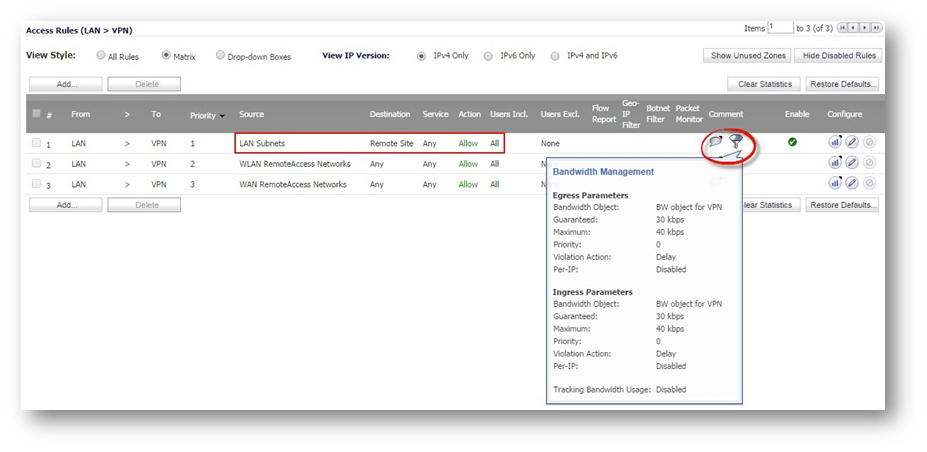
Configuring VPN to LAN access rule with BWM
- Navigate to Policies| Firewall | Access Rules page in the GUI.
- Choose the From, Choose VPN to LAN as shown in the GUI.
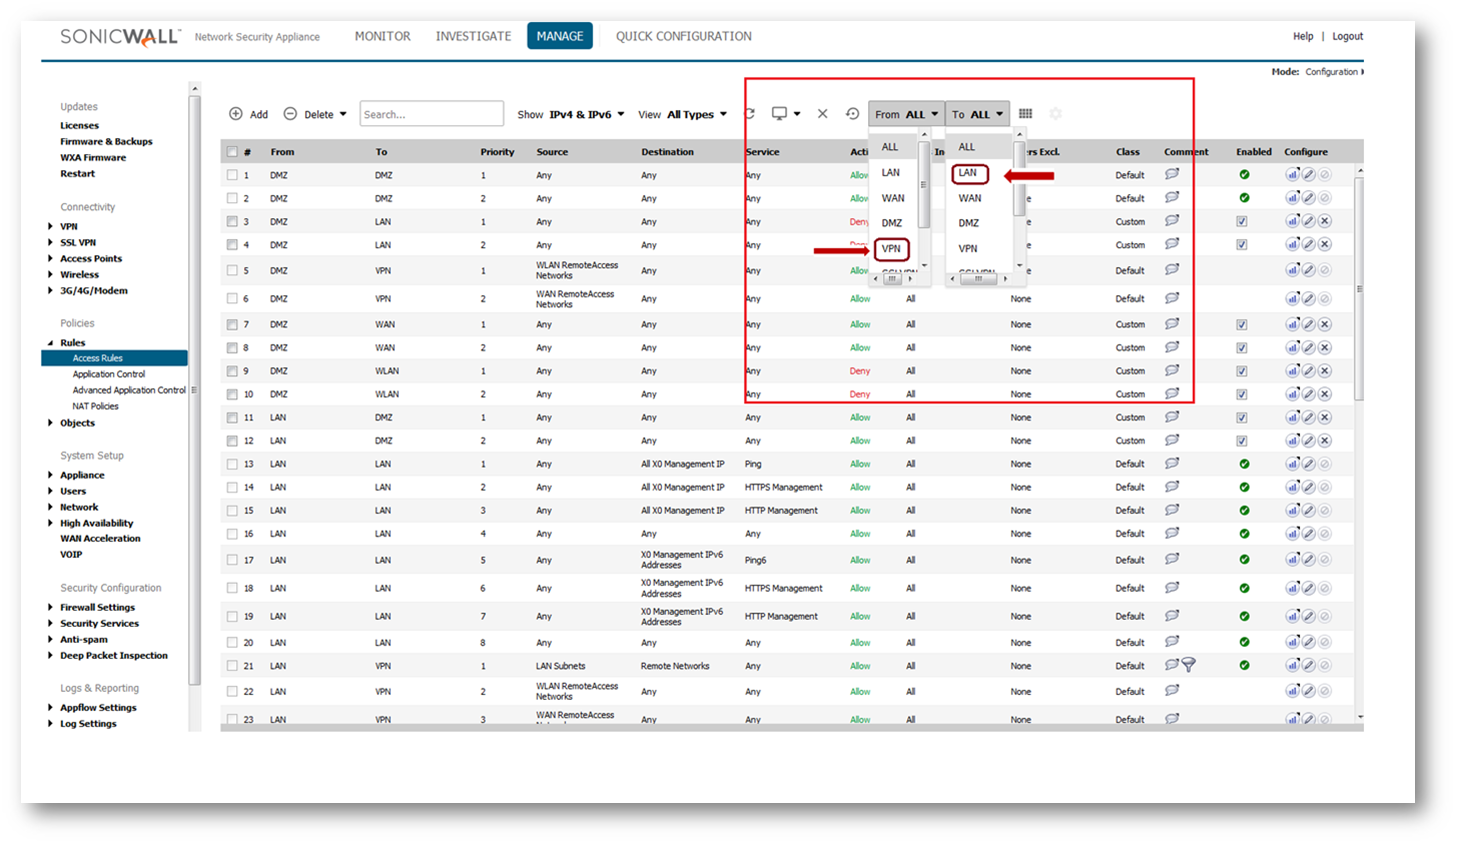
- Click configure option of appropriate VPN to LAN access rule.
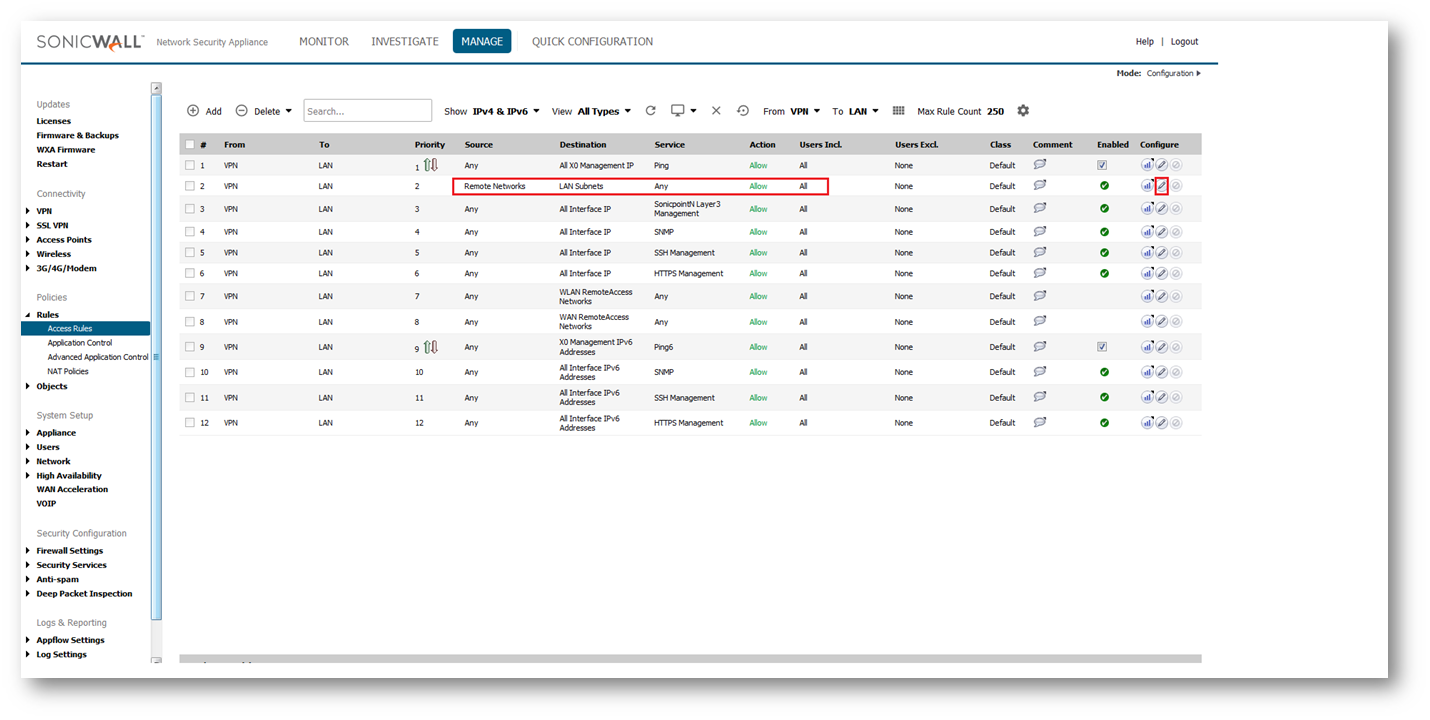
- Navigate to BWM tab.
- Set, Enable Egress Bandwidth Management (Allow rules only) Bandwidth Object and Enable Ingress Bandwidth Management (Allow rules only) Bandwidth Object to the bandwidth object that was created previously.
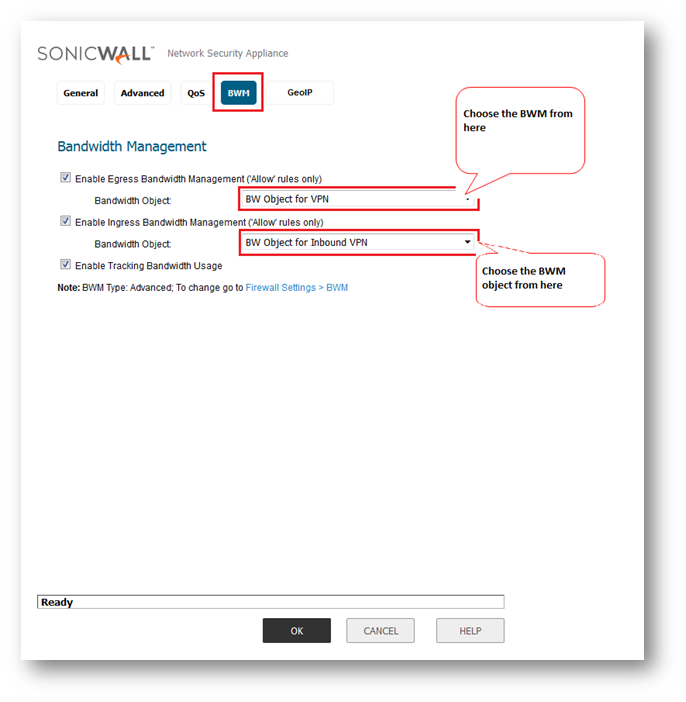
- Click OK.
- To ensure BWM is applied on VPN to LAN access rule, there is a Filter Symbol that gives the Bandwidth Management information as shown in the screenshot below.
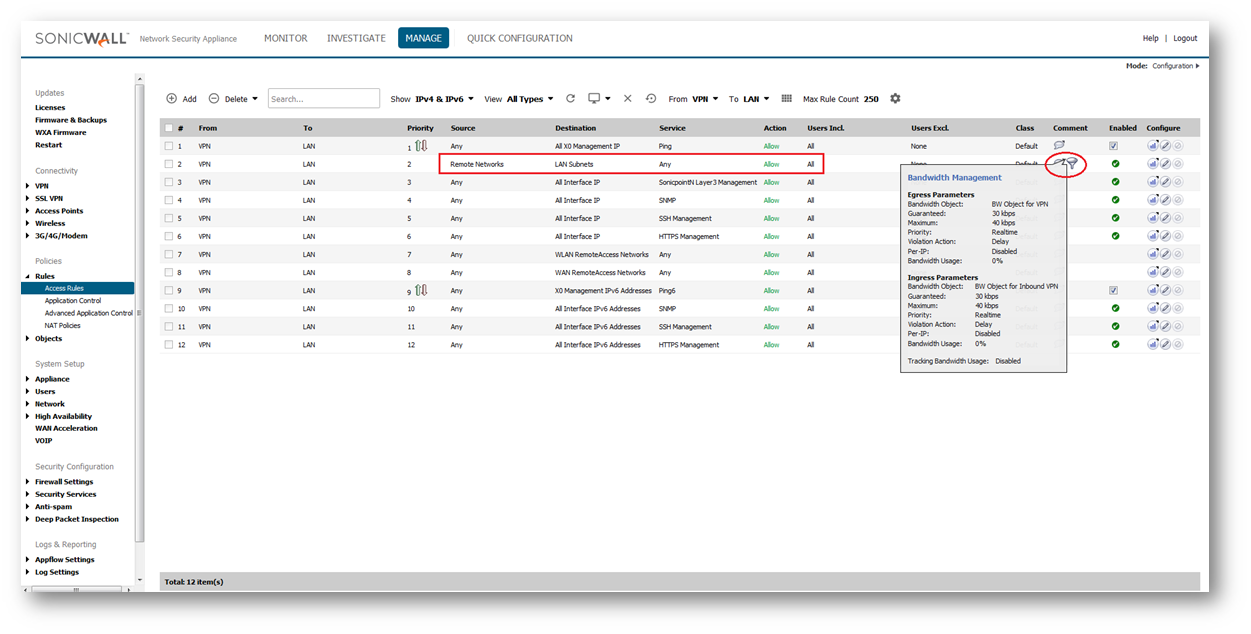
- Follow the above steps on the peer SonicWall device if there is a need for bandwidth management on the remote firewall too.
Resolution for SonicOS 6.2 and Below
The below resolution is for customers using SonicOS 6.2 and earlier firmware. For firewalls that are generation 6 and newer we suggest to upgrade to the latest general release of SonicOS 6.5 firmware.
Enabling Bandwidth Management on SonicWall
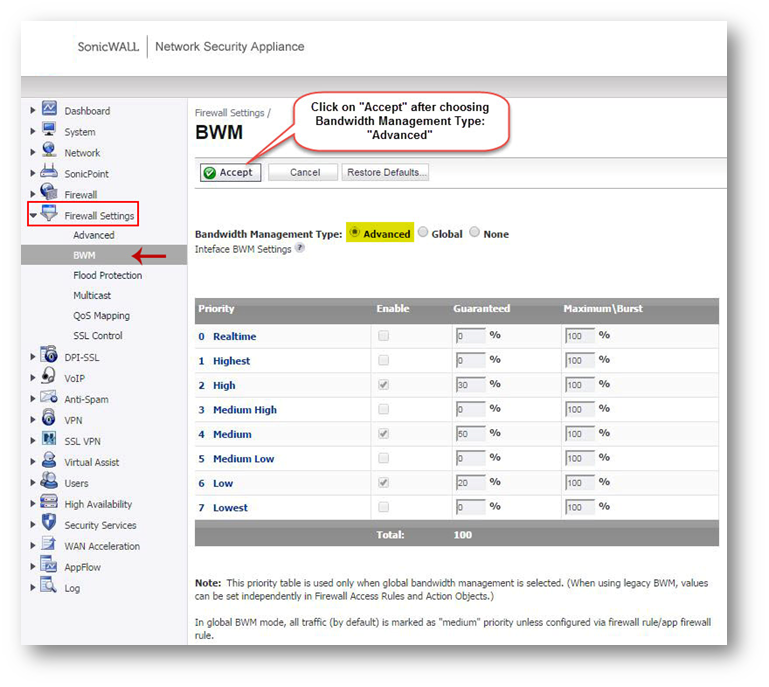
- Navigate to Firewall Settings | BWM page in the GUI.
- Choose Bandwidth Management Type as "Advanced" and click Accept on top.
Enabling Bandwidth Management on the Active WAN Interface(s)
- Navigate to Network | Interfaces page in the GUI.
- Click on Configure option of the active WAN connection. (Here single WAN connection is used).
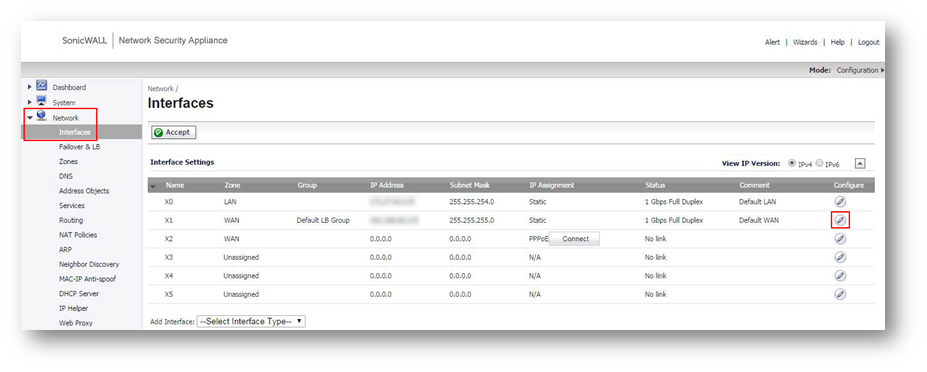
- In the Advanced tab, under Bandwidth Management enable the check boxes Enable Interface Egress Bandwidth Limitation & Enable Interface Egress Bandwidth Limitation and specify the Egress & IngressBandwidth Values in terms of Kbps respectively.
- Click OK .

Creating Bandwidth Object
- Navigate to Firewall | Bandwidth Objects page in the GUI.
- Click Add under Bandwidth Objects.
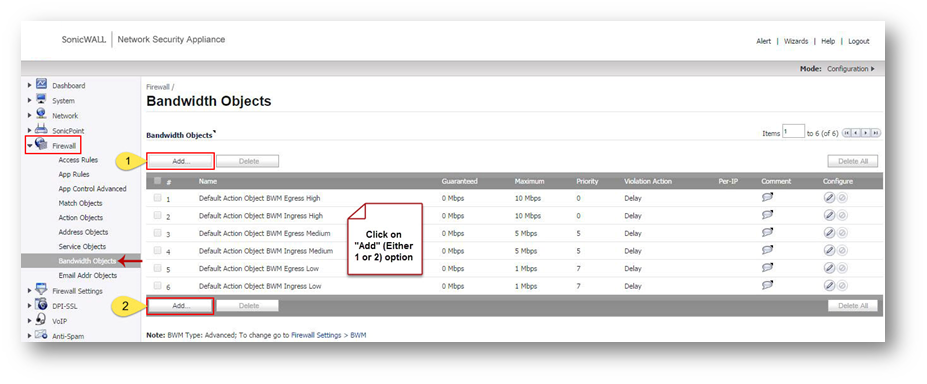
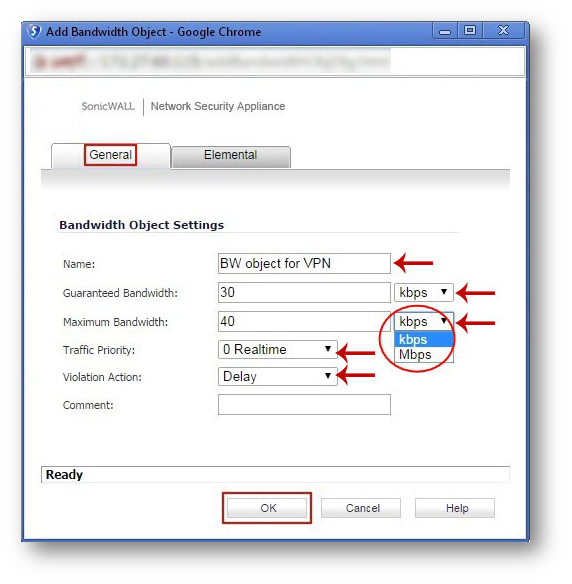
- In the new window, enter the fields as given below.
- Name: Any friendly name for the bandwidth object.
- Guaranteed Bandwidth: Enter the amount of bandwidth that this bandwidth object will guarantee to provide for a traffic class (Kbps or Mbps).
- Maximum Bandwidth: Enter the maximum amount of bandwidth that this bandwidth object will provide for a traffic class.
- Traffic Priority: Enter the priority that this bandwidth object will provide for a traffic class (highest priority is 0 and lowest priority is 7).
- Violation Action: Delay or Drop - Select the action that this bandwidth object will provide (delay or drop) when traffic exceeds the maximum bandwidth setting.
- Comment: Enter a text comment or description for this bandwidth object (optional).
- Click OK .

Configuring LAN to VPN access rule with BWM
- Navigate to Firewall | Access Rules page in the GUI.
- Choose the View Style: Matrix.
- Click on from LAN to VPN matrix option.
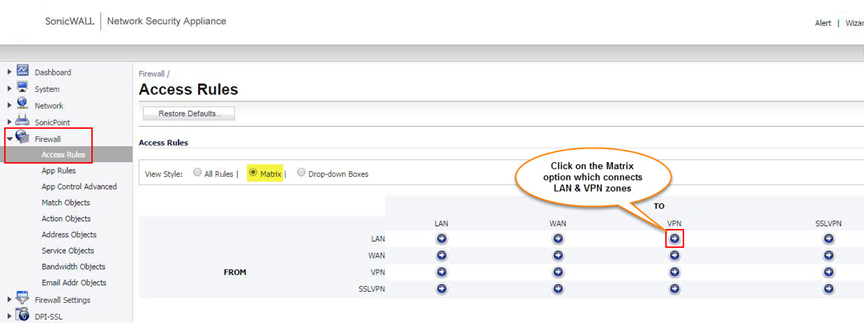
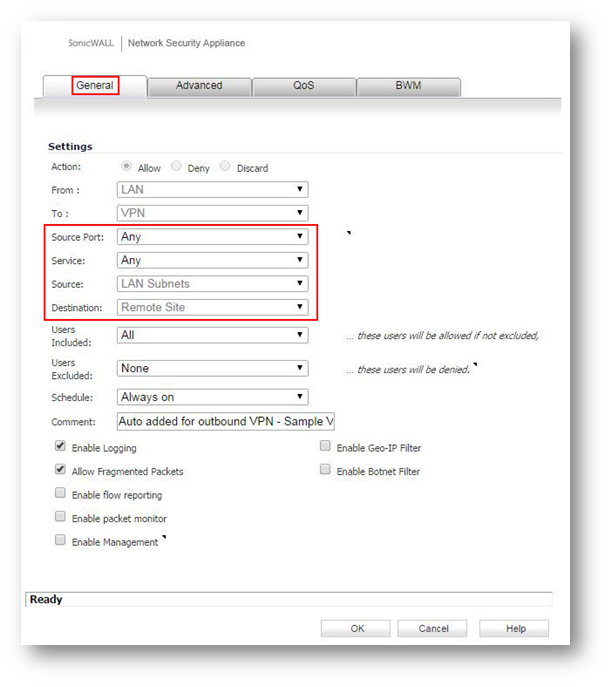
- Click on the configure option of appropriate LAN to VPN access rule.

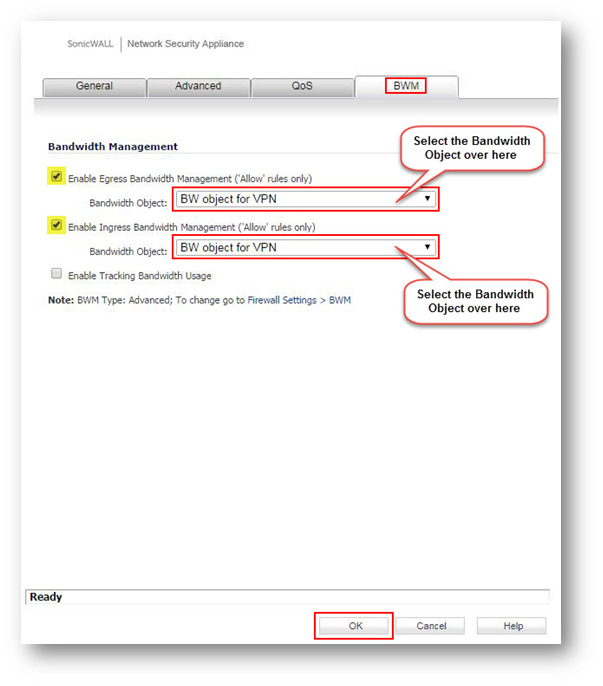
- Navigate to BWM tab.
- Set, Enable Egress Bandwidth Management ('Allow' rules only) Bandwidth Object and Enable Ingress Bandwidth Management ('Allow' rules only) Bandwidth Object to the bandwidth object that was created previously.
- Click OK.
- To ensure BWM is applied on LAN to VPN access rule, there is a Filter Symbol that gives the Bandwidth Management information as shown in the screenshot below.

Configuring VPN to LAN access rule with BWM
- Navigate to Firewall | Access Rules page in the GUI.
- Choose the View Style: Matrix.
- Click on from VPN to LAN matrix option.
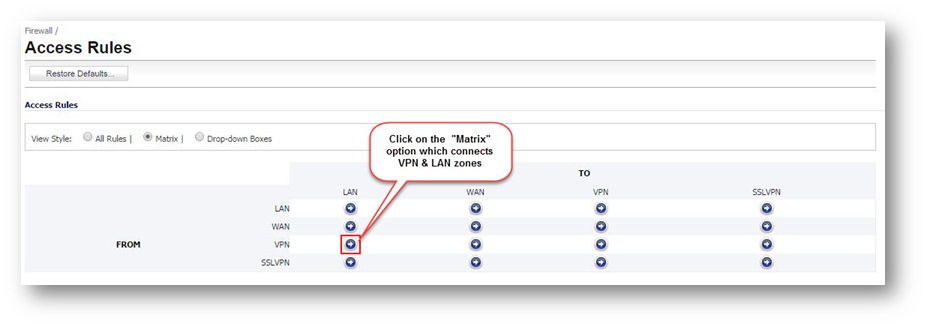
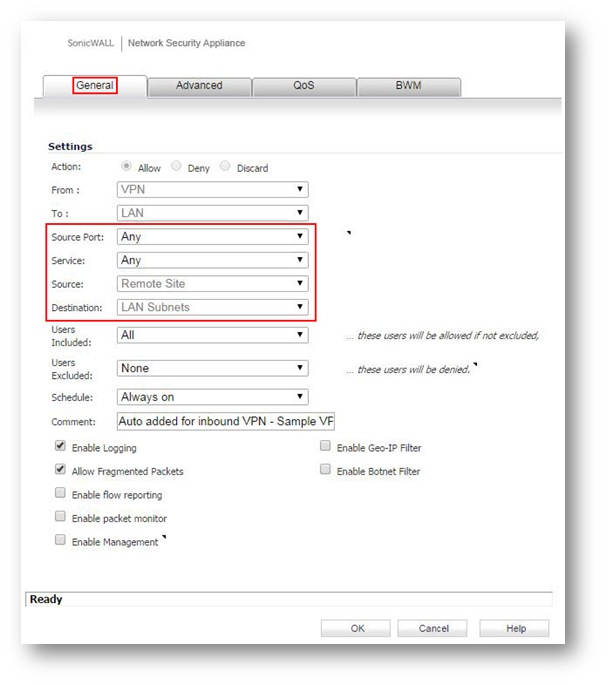
- Click on the configure option of appropriate VPN to LAN access rule.
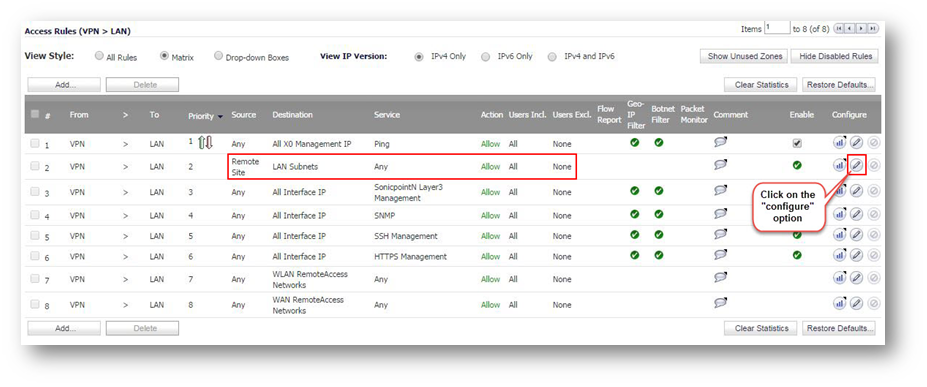
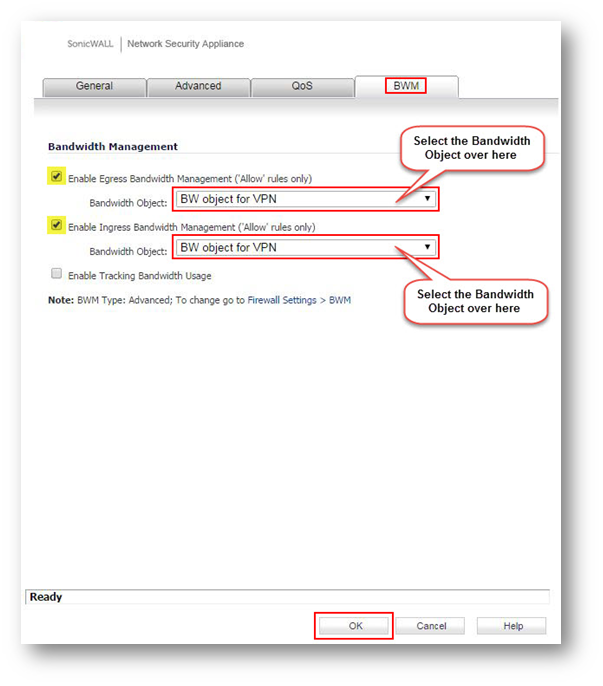
- Navigate to BWM tab.
- Set, Enable Egress Bandwidth Management ('Allow' rules only) Bandwidth Object and Enable Ingress Bandwidth Management ('Allow' rules only) Bandwidth Object to the bandwidth object that was created previously.
- Click OK.
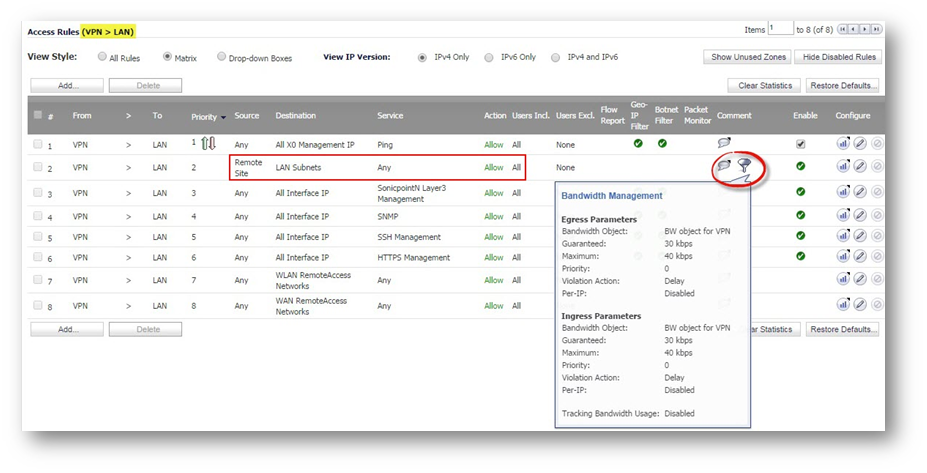
- To ensure BWM is applied on VPN to LAN access rule, there is a Filter Symbol that gives the Bandwidth Management information as shown in the screenshot below.
- Follow the above steps on the peer SonicWall device if there is a need for bandwidth management.
Related Articles
- Error:"Invalid API Argument" when modifying the access rules
- Cysurance Partner FAQ
- Configure probe monitoring for WAN Failover and Loadbalancing - SonicWall UTM
Categories
- Firewalls > NSa Series > VPN
- Firewalls > NSv Series > VPN
- Firewalls > TZ Series > VPN


 YES
YES NO
NO