-
Products
-
SonicPlatform
SonicPlatform is the cybersecurity platform purpose-built for MSPs, making managing complex security environments among multiple tenants easy and streamlined.
Discover More
-
-
Solutions
-
Federal
Protect Federal Agencies and Networks with scalable, purpose-built cybersecurity solutions
Learn MoreFederalProtect Federal Agencies and Networks with scalable, purpose-built cybersecurity solutions
Learn More - Industries
- Use Cases
-
-
Partners
-
Partner Portal
Access to deal registration, MDF, sales and marketing tools, training and more
Learn MorePartner PortalAccess to deal registration, MDF, sales and marketing tools, training and more
Learn More - SonicWall Partners
- Partner Resources
-
-
Support
-
Support Portal
Find answers to your questions by searching across our knowledge base, community, technical documentation and video tutorials
Learn MoreSupport PortalFind answers to your questions by searching across our knowledge base, community, technical documentation and video tutorials
Learn More - Support
- Resources
- Capture Labs
-
- Company
- Contact Us
AWS Integration with SonicWall (SonicOS 6.5.X)


Description
The SonicOS integration with Amazon Web Services (AWS) enables logs to be sent to AWS CloudWatch Logs, Address Objects and Groups to be mapped to EC2 Instances, and creation of VPNs to allow connections to Virtual Private Clouds (VPCs). SonicOS communicates with the various Application Programming Interfaces (APIs) of AWS.
Topics
- Creating an AWS Identity
- AWS Access Configuration in SonicOS
- AWS Logs Configuration
- AWS Objects Configuration
- AWS VPN Configuration
Resolution
- Creating an AWS Identity
IAM Identities, including Users and Groups, can be created and managed from the IAM page in the AWS Management Console. Assuming that the AWS Account is already created and that an administrator with either Root access or widespread privileges is logged into that account, it is then necessary to create an IAM User, if one does not already exist, that will be used by the firewall to access the various AWS APIs for the services supported by the firewall.
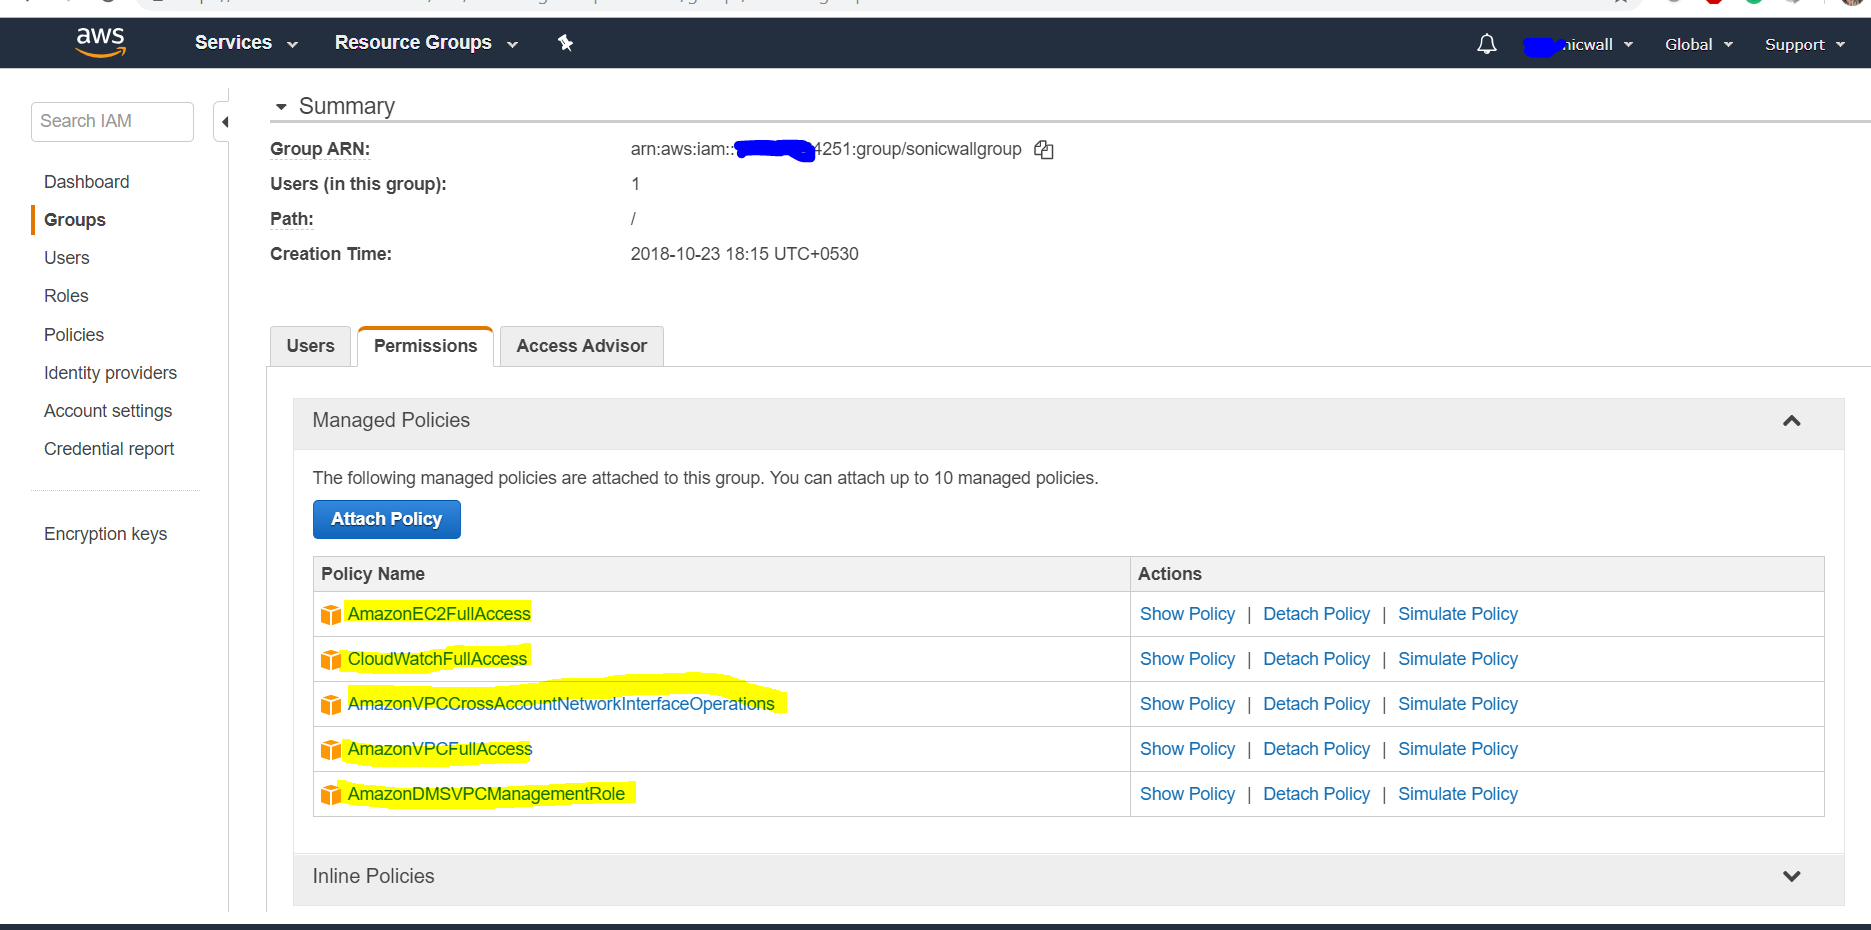
The user needs certain permissions to access the different services. These permissions can either be granted directly to the user or included in a security access policy assigned to an IAM Group and then the user added to that group.The security policy used, either for a group to which the user belongs or attached to the user directly, must include the following permissions (Mandatory).
- AmazonEC2FullAccess – For AWS Objects and AWS VPN
- CloudWatchLogsFullAccess – For AWS Logs
You can optionally include the below permissions.
- AmazonVPCCrossAccountNetworkInterfaceOperations
- AmazonVPCFullAccess
- AmazonDMSVPCManagementRole
The IAM user can be created specifically for use by the firewall alone. However, if the same user is going to access the AWS Management Console, the Programmatic access checkbox must be selected.The second step of the Add User wizard determines which permissions the user will have assigned, either through adding the user to a group or attaching the permission policies directly. After reviewing the details of the user to be created and pressing the Create User button, there is a final and critical stage.
- User Creation (IAM- AWS)
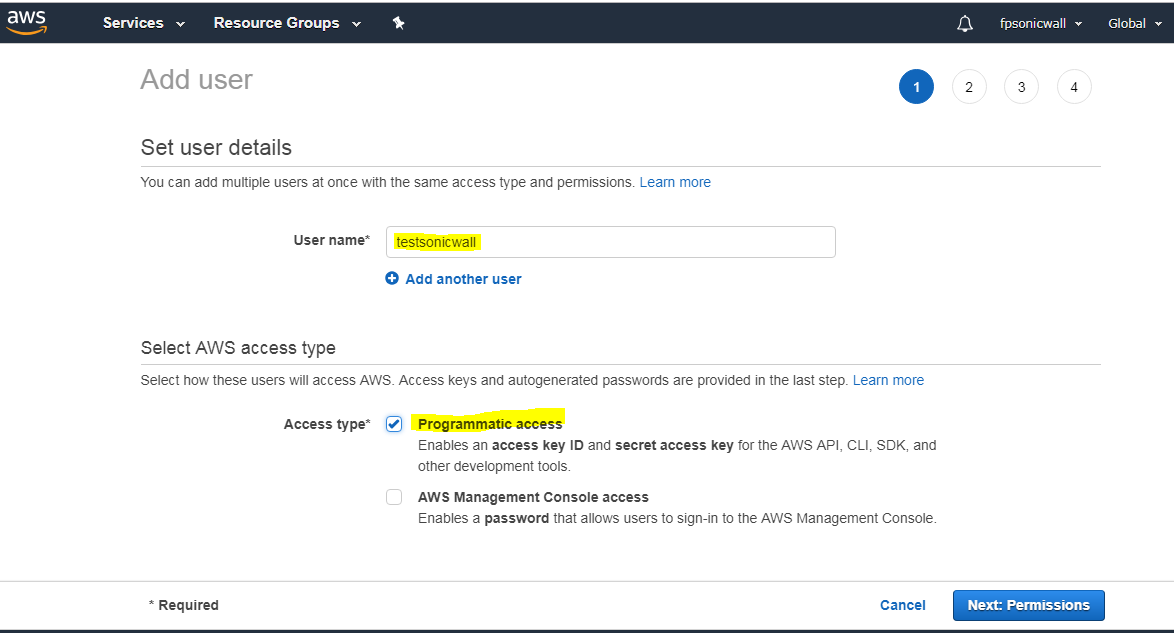
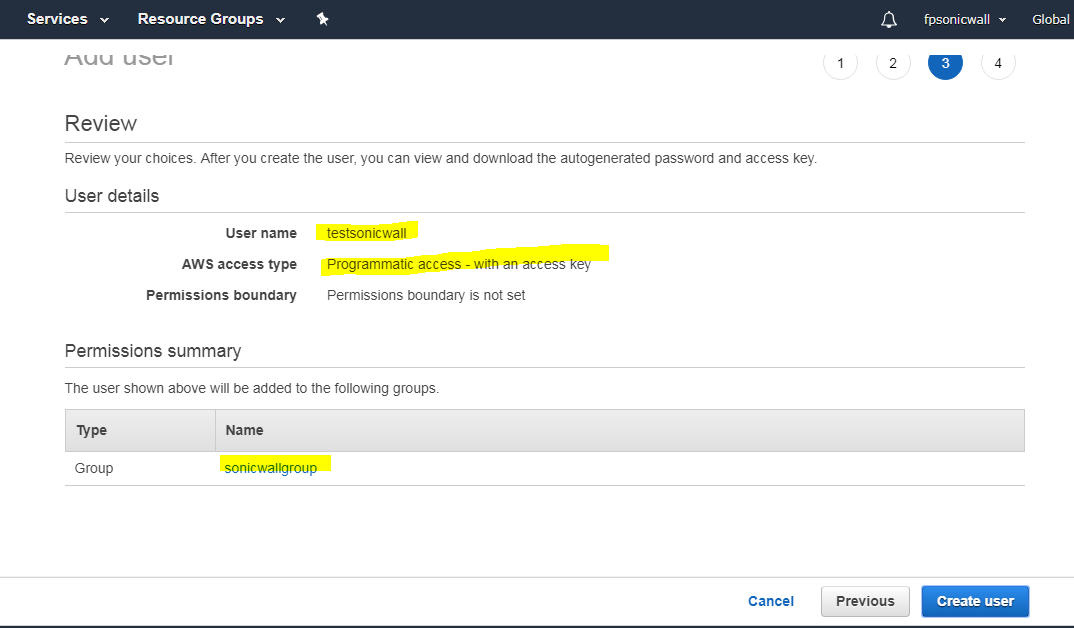
You must retrieve the Secret Access Key that has been created for the user. The Secret Access Key together with the Access Key will be used in the configuration of the firewall. It will be needed for all API access to AWS. You should either copy it to a safe location or download the CSV file and keep that in a safe, secure location.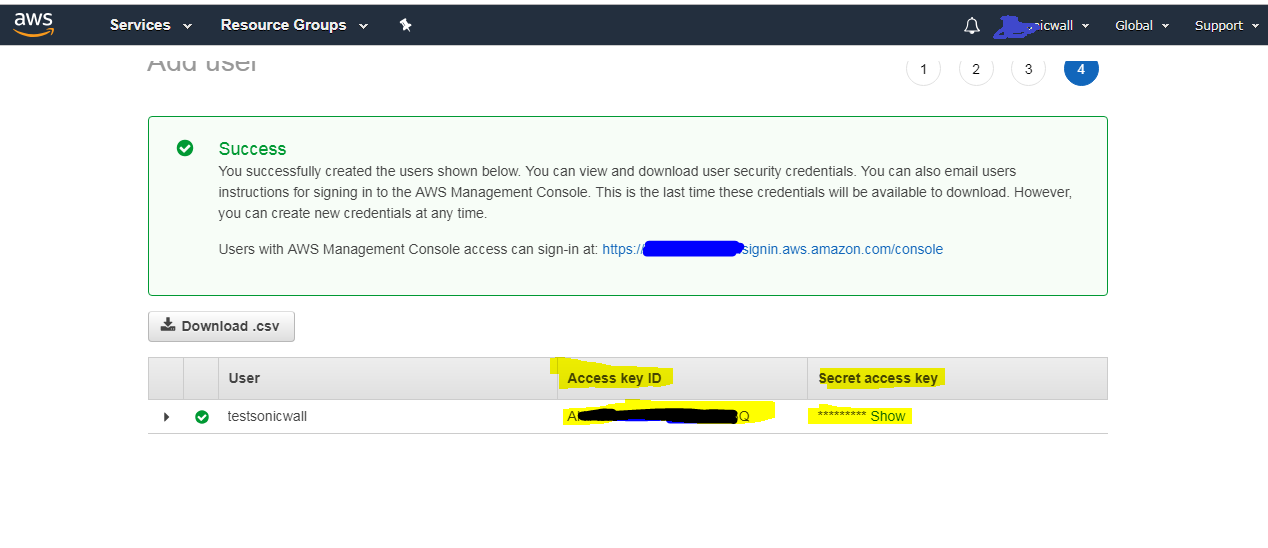
- AWS Access Configuration in SonicOS
You can configure SonicOS with the AWS Security Credentials on the MANAGE | System Setup | Network | AWS Configuration page.The settings include an AWS Identity and Access Management (IAM) User's Access Key (Access Key ID), the corresponding Secret Access Key and a default region. The default region is used by the AWS Logs page, and for initialization of the AWS Objects and AWS VPN pages (though different regions can be selected on those two pages).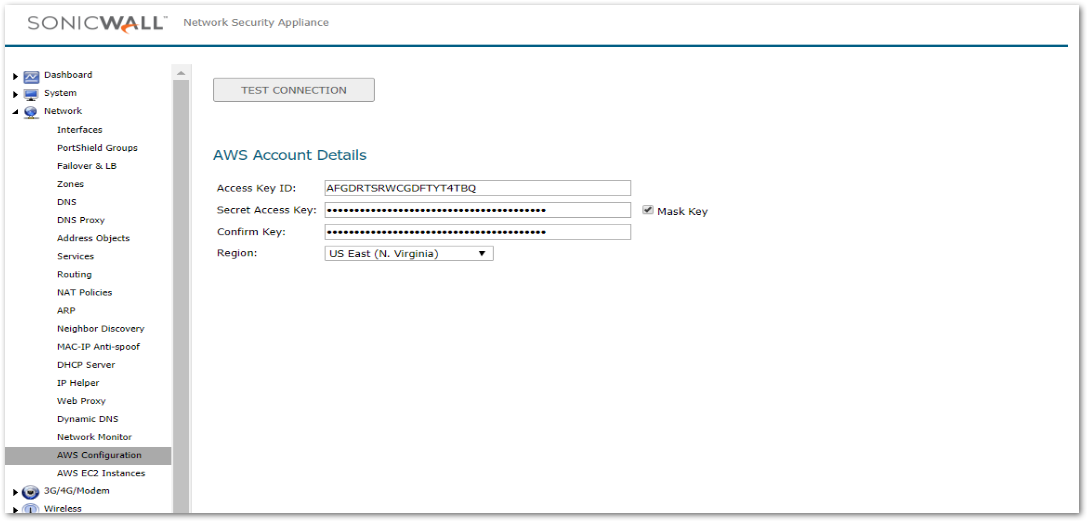
- AWS Logs Configuration
Logged events generated on the firewall can be sent to the AWS CloudWatch Logs service. From there, the data can be used by AWS hosted analysis tools such as ElasticSearch and Kibana.The SonicOS AWS Logs page allows configuration of the AWS endpoint to which the logs are sent along with settings affecting the frequency with which the data is posted.
In order to send the logs from SonicOS to Amazon CloudWatch Logs, you must first create a Log Group and a Log Stream in AWS. Assuming that you have an Identity Access Management (IAM) user account with the appropriate permissions to access CloudWatch Logs from the AWS Console, navigate to the CloudWatch section and select the Logs item in the left hand navigation menu. Ensure that you have selected the appropriate AWS Region for the logs to be stored. As with many AWS services, CloudWatch Logs is region specific. First create the Log Group and then the Log Stream.
- To enable AWS logs in SonicOS
- Navigate to MANAGE | Logs & Reporting | Log Settings |AWS Logs page.
- Select Enable Logging.
- Ensure that the selected AWS Region is the one in which the Log Group and Log Stream were created. You can change the region used by the firewall either on this page or on the AWS Configuration page
- Enter the names of the Log Group and Log Stream that you created earlier and which will hold the logs sent to AWS CloudWatch Logs.
- The logs will be sent at the specified Synchronization Interval. Change the Interval to suit your needs.
- Click ACCEPT.
- AWS Objects Configuration
The AWS Objects page is used to map the IP addresses of EC2 Instances running in the AWS Cloud with Address Objects (AOs) and Groups (AGs) configured on the firewall.New AOs are created for Instance IP addresses, AGs for all addresses of an Instance and those Instance AGs can be added to existing Address Groups. Those objects, as with any other AOs and AGs, can then be used in firewall policies for networking, access control and to shape the interaction with EC2 Instances running on AWS.
In AWS, tag the EC2 Instance to then be able to use that tag when defining Address Object Mappings in SonicOS. With the Instance selected, click on the Actions button to launch the popup menu, and then choose Instance Settings | Add/Edit Tags. - To create a new Address Object Mapping
- Navigate to MANAGE | Policies | Objects | AWS Objects page in SonicOS.
- Click New Mapping.
- Click New Condition button to choose from the whole range of allowable properties.
 EXAMPLE: Select Custom Tag for Property, then enter the key and value used in your EC2 Instance tag and click OK.
- Optionally add a second mapping condition by clicking New Condition again.
- When ready, click OK.
- Click ACCEPT to save the mapping. Address Objects are then created for the IP addresses of each EC2 Instance that matches the mapping.
- Select Enable Mapping.
- Click ACCEPT to make the Address Object Mappings take effect.
With mappings in place, a Synchronization Interval set, Regions to Monitor specified, and Enable Mapping selected, you will see Address Objects and Groups representing the matched EC2 Instances and their IP addresses start to appear.On the AWS Objects page, the Address Group and the Mapped Address Groups are shown in the AWS EC2 Instances table. Expanding the relevant row reveals the Address Objects corresponding to an Instance's public and private IP addresses. You can see those same host Address Objects on the Objects | Address Objects page in SonicOS.
- AWS VPN Configuration
Establishing and managing the connections between the computers on the local area network (LAN) and those in the Virtual Private Clouds (VPCs) on AWS is achieved by using the MANAGE | Connectivity | VPN | AWS VPN page in SonicOS.The VPC table on the SonicOS AWS VPN page reflects the VPC information that is available on the AWS Console under the VPC Dashboard. - To create a new VPN connection
- Navigate to MANAGE | Connectivity | VPN | AWS VPN page in SonicOS.
- Click the Create VPN Connection button in the row for the VPC you wish to connect to the firewall.
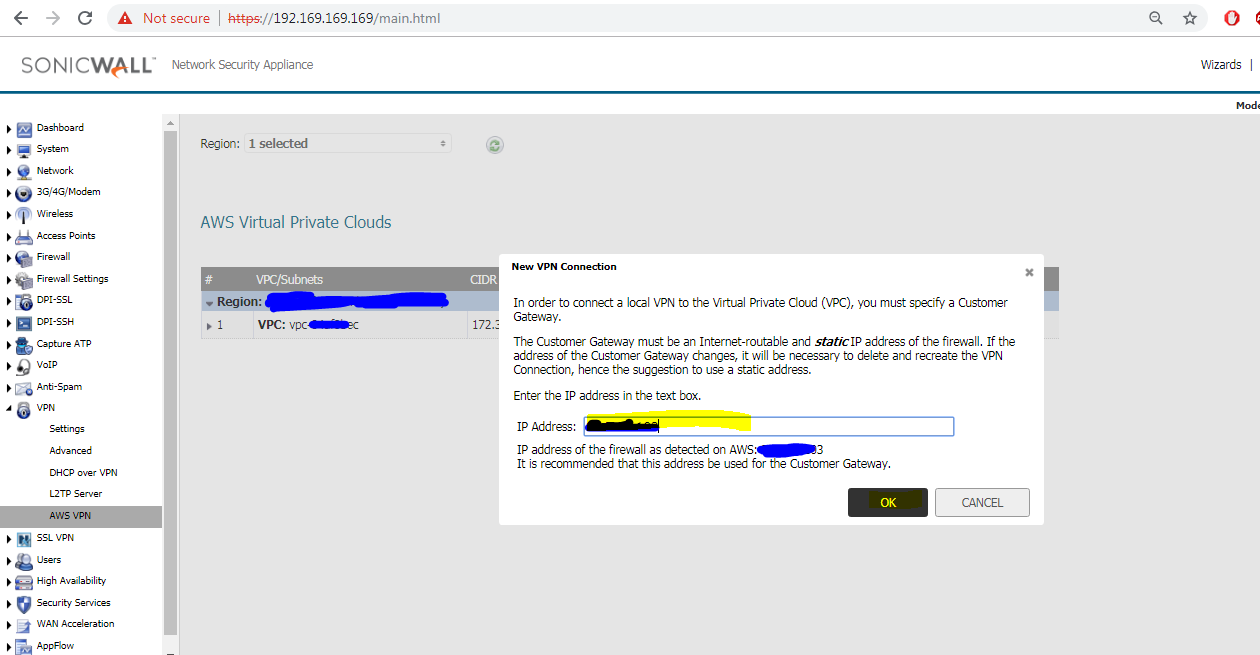
- In the New VPN Connection dialog, verify that the IP Address field contains the public IP address of the firewall, or change it as needed. If the firewall is behind a router or some other proxy, NAT rules should be put in place to ensure VPN traffic initiated from the AWS side is able to be routed back to the firewall.
- If the firewall detects that route propagation is disabled for one or more route tables within a VPC, the dialog will include the Propagate connection to all existing subnets in the VPC option. Select it unless you prefer to propagate the connection only to specific subnets (see Step 6).
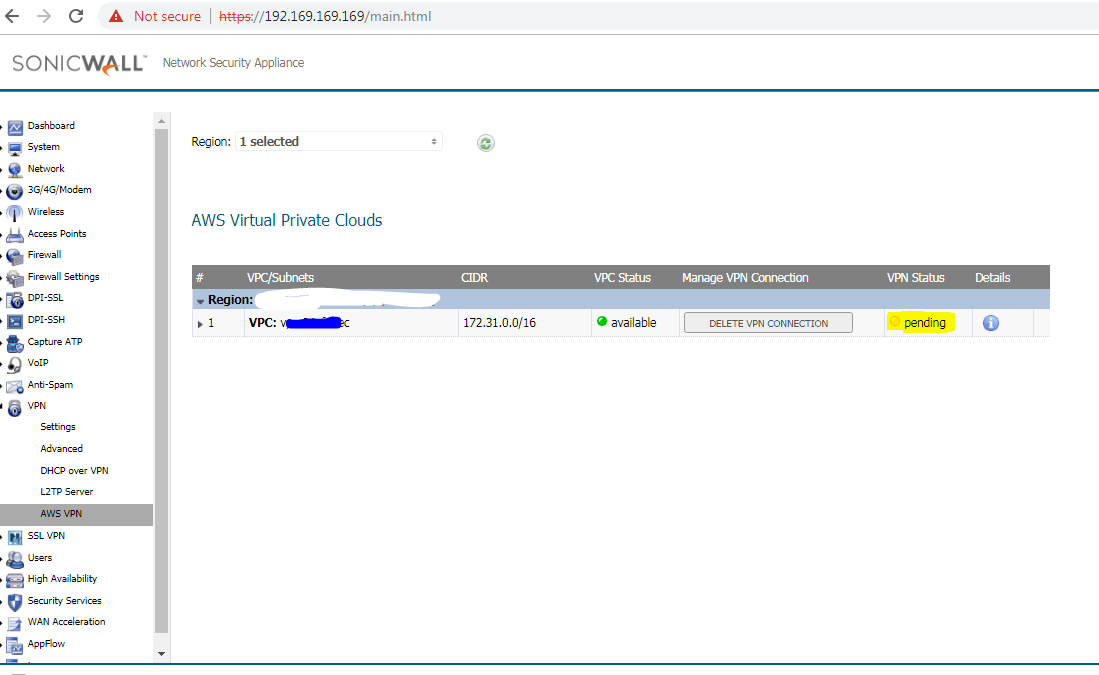
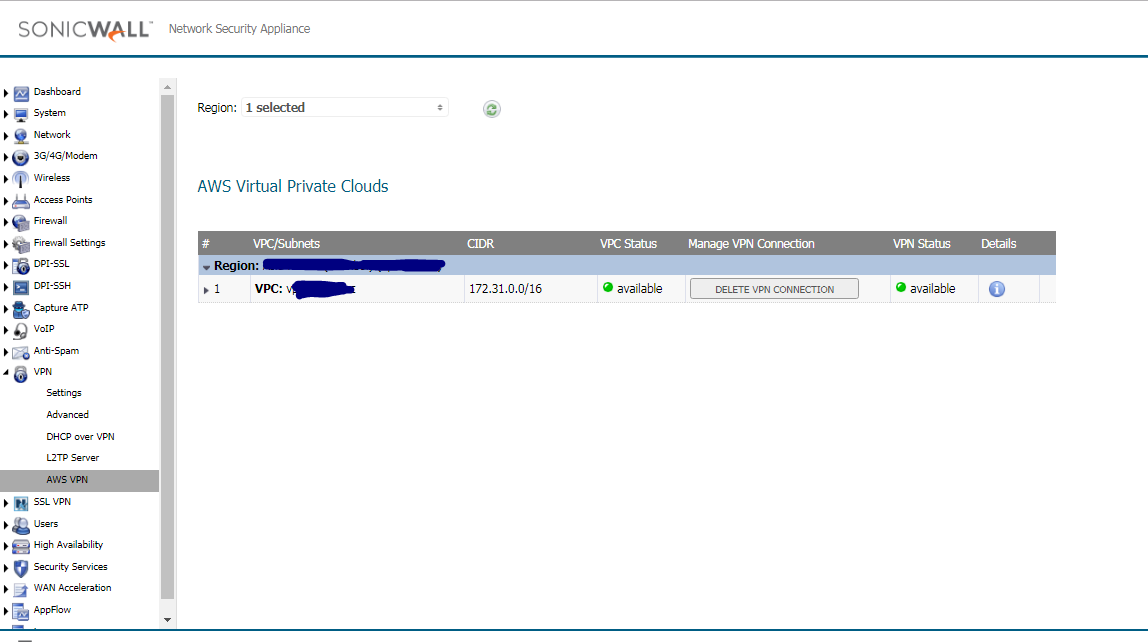
- Click OK. A series of processes on both the firewall and AWS configure the VPN connection between them. You can click the Information ‘i’ button in the table row for details about the VPN connection. Use the Refresh button on the AWS VPN page to reload the data in the table and on the associated dialogs.
- After the VPN Connection is established, expand the row on the AWS VPN page to display all of the subnets in that VPC, organized by route table. Select Propagate Connection for each route table (unless you chose to enable propagation for all route tables in Step 4) and the associated subnets.

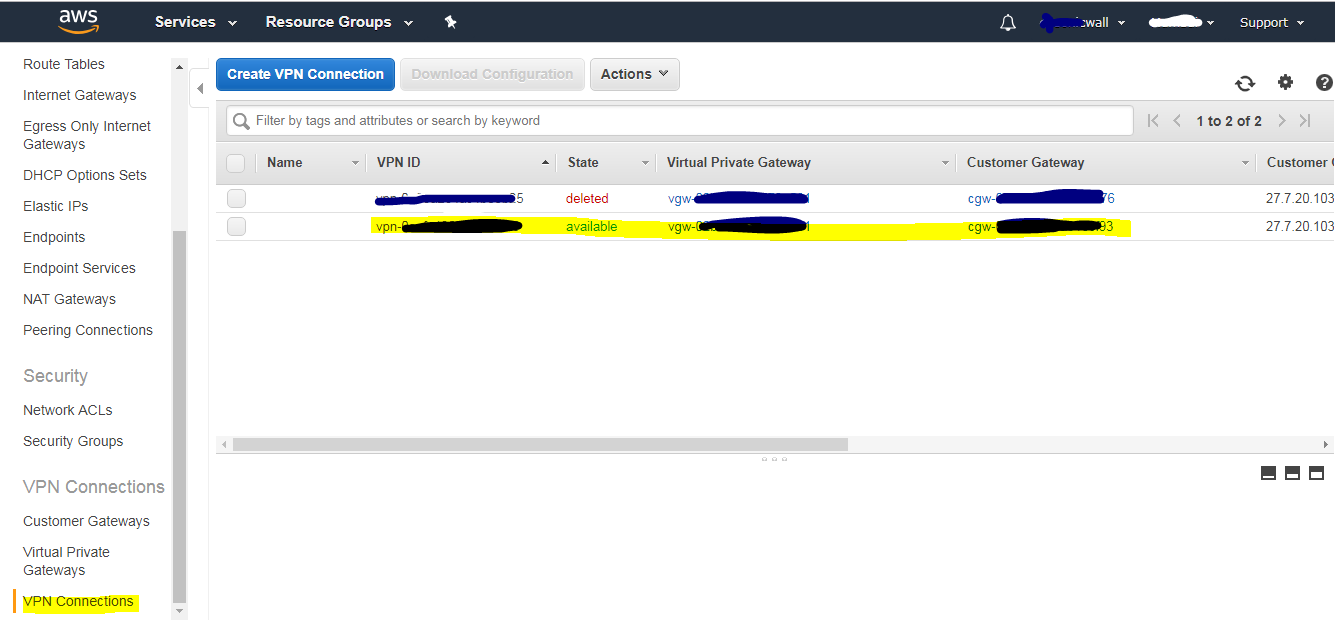
- On AWS Console
- On SonicWall under AWS VPN
- Auto Created VPN Policies
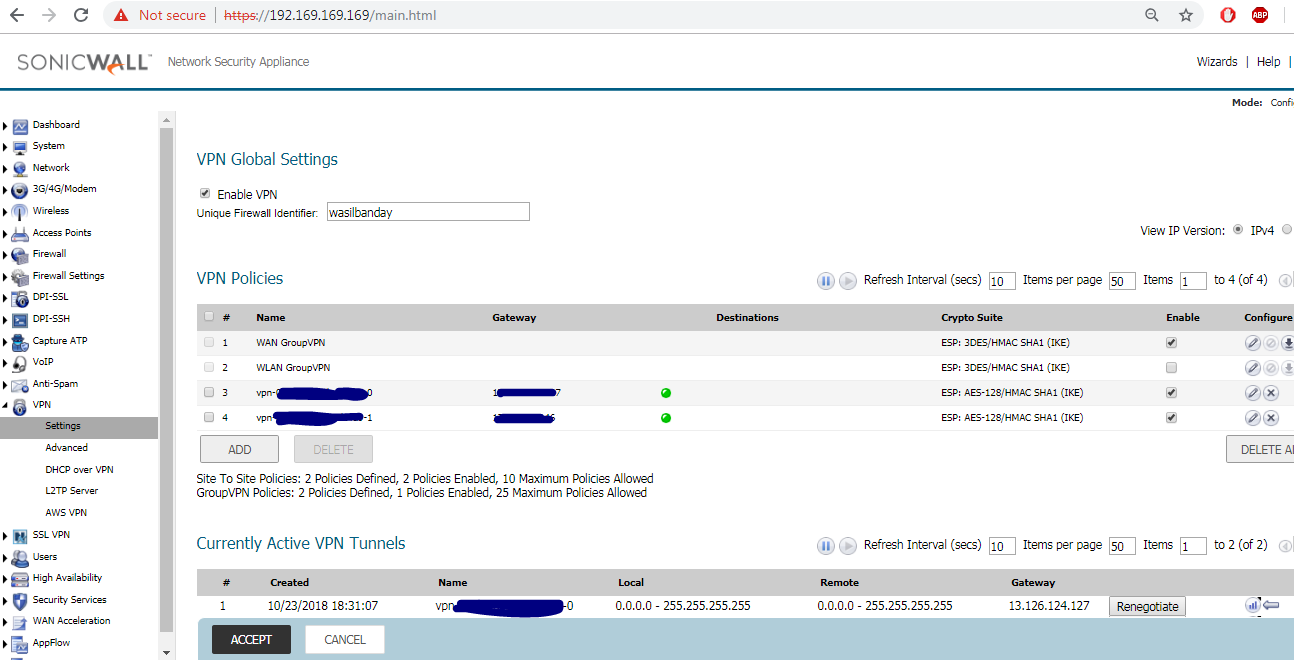
On SonicWall after the tunnel is available (Auto-Created Routes):
- To delete a VPN connection
- On the MANAGE | Connectivity | VPN | AWS VPN page, click Delete VPN Connection in the related table row.
- Click YES in the confirmation dialog.Deletion removes the associated VPN and Route Policies, and the Tunnel interfaces on the firewall. On AWS, it removes the customer gateway only if it is not being used elsewhere (perhaps on other VPN Connections from the same firewall, but to other VPCs). It does not delete the VPN Gateway or change the Route Propagation settings.
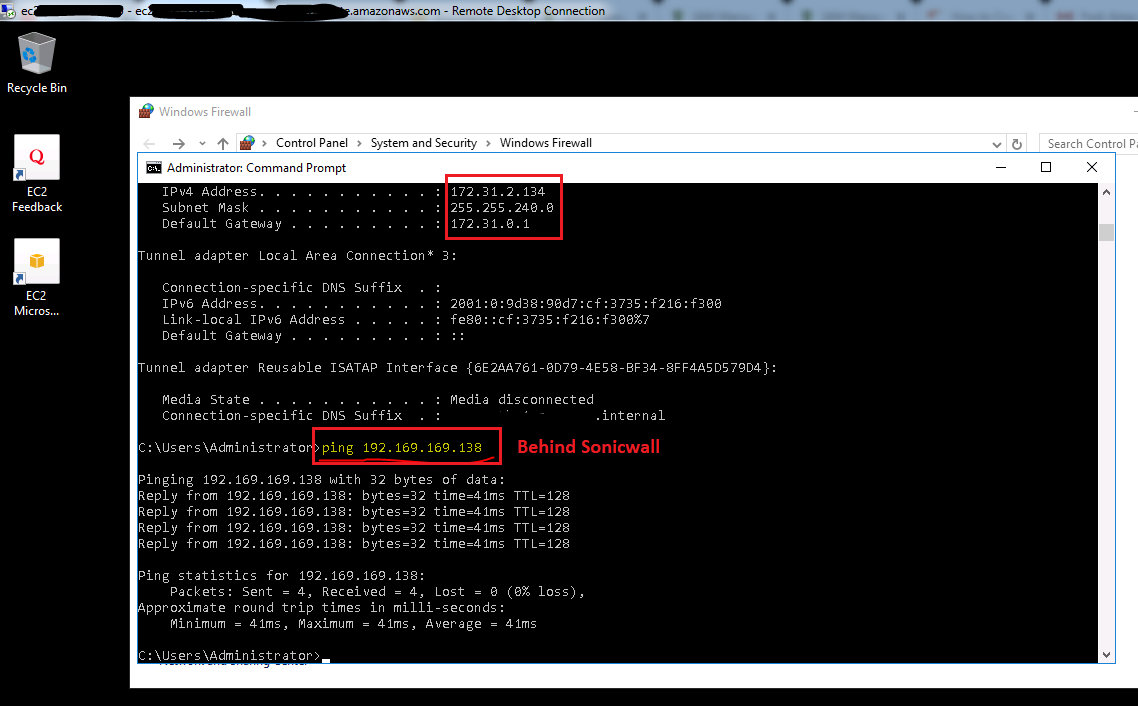
- Test: From EC2 Instance (AWS) to LAN Subnet behind SonicWall
Related Articles
- Error:"Invalid API Argument" when modifying the access rules
- Cysurance Partner FAQ
- Configure probe monitoring for WAN Failover and Loadbalancing - SonicWall UTM
Categories
- Firewalls > NSv Series > AWS
- Firewalls > NSa Series > VPN
- Firewalls > TZ Series > VPN


 YES
YES NO
NO